Confit Blood Orange & Dark Chocolate Tartlets
Confit Blood Orange & Dark Chocolate Tartlets
Don’t be frightened by this lengthy recipe. Each part by itself is fairly straight forward and the whole dessert can be made over a day or two so you don’t need to rush it. You can also easily store any leftover elements and use them in other recipes at a later date.
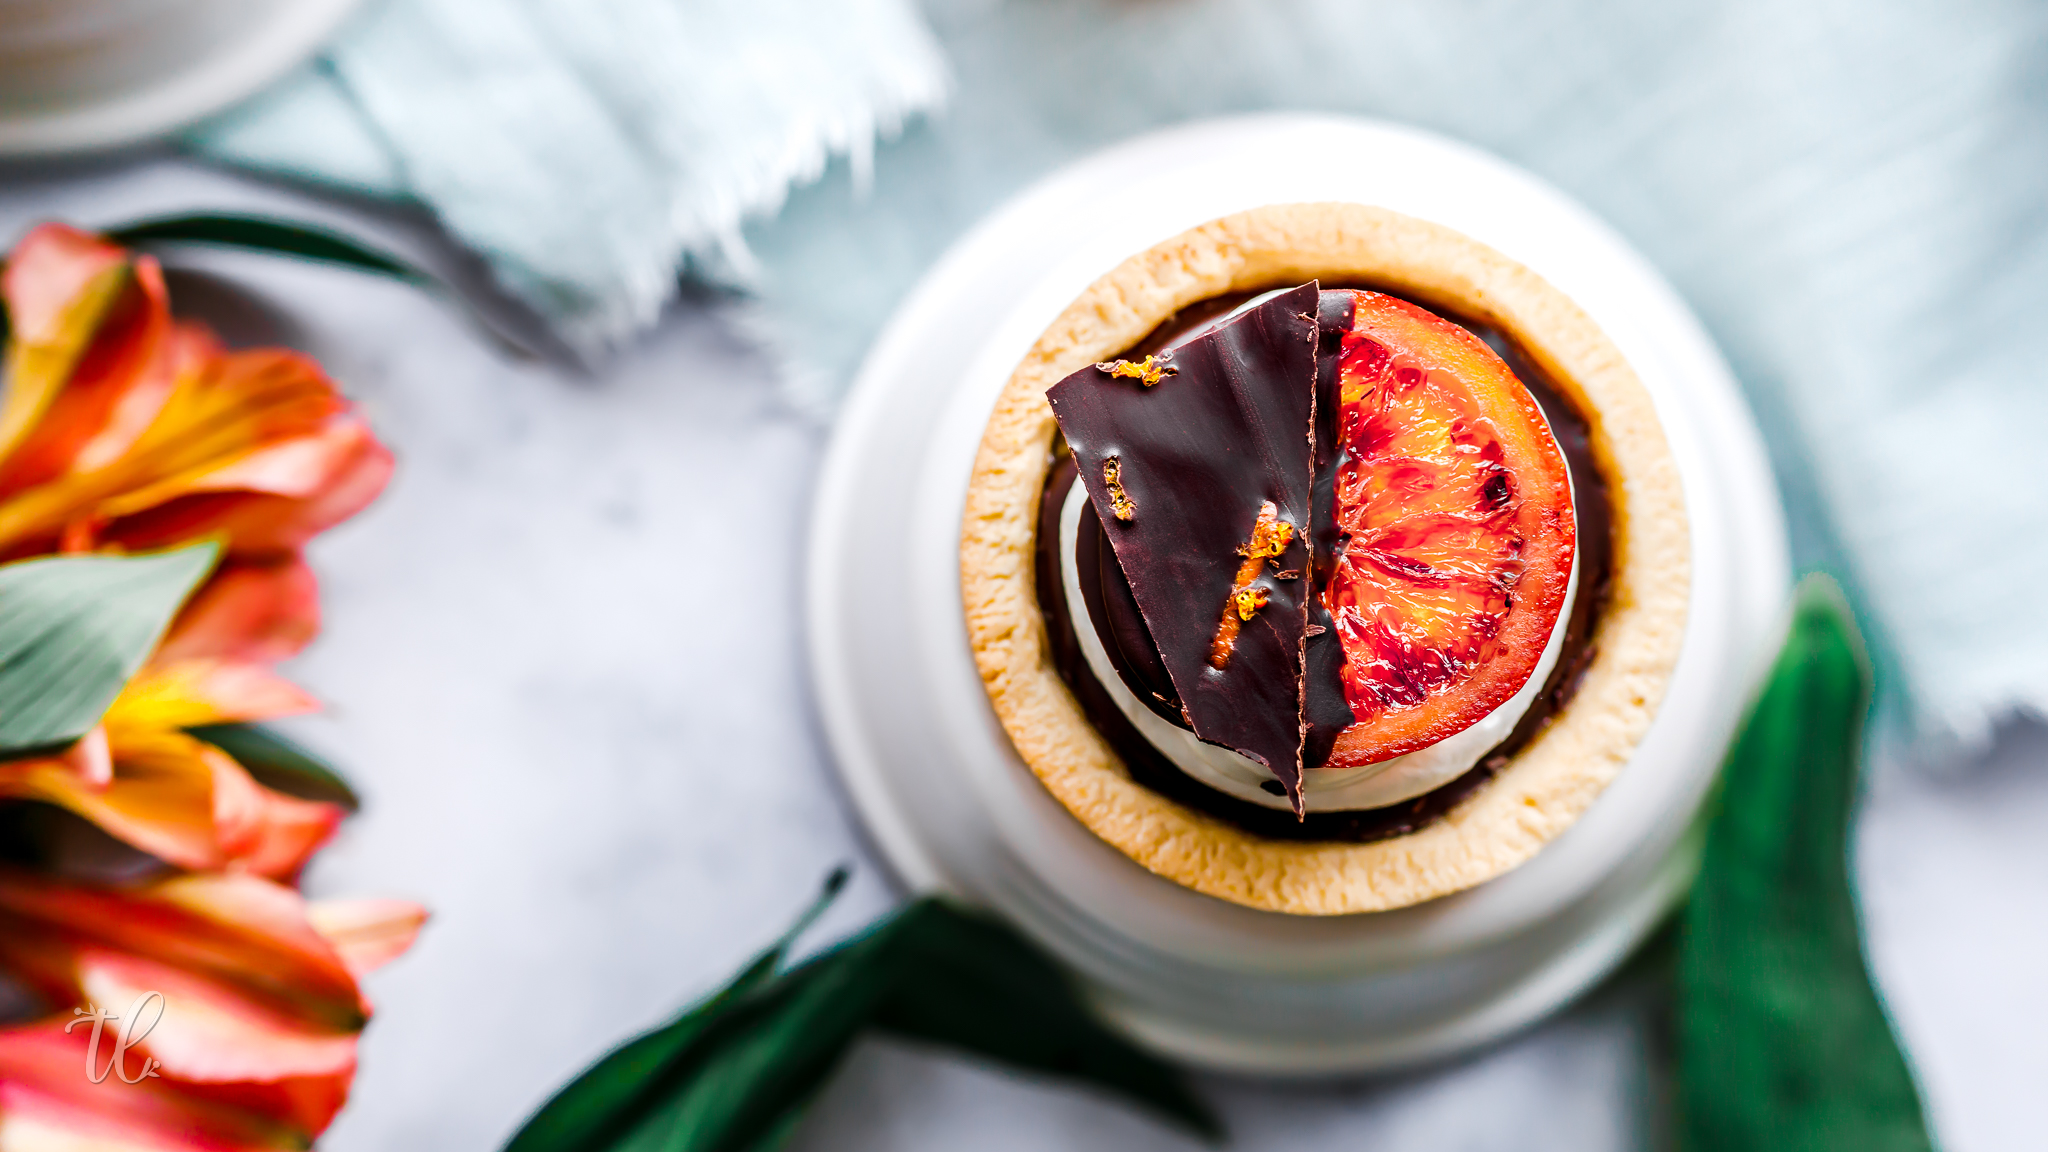
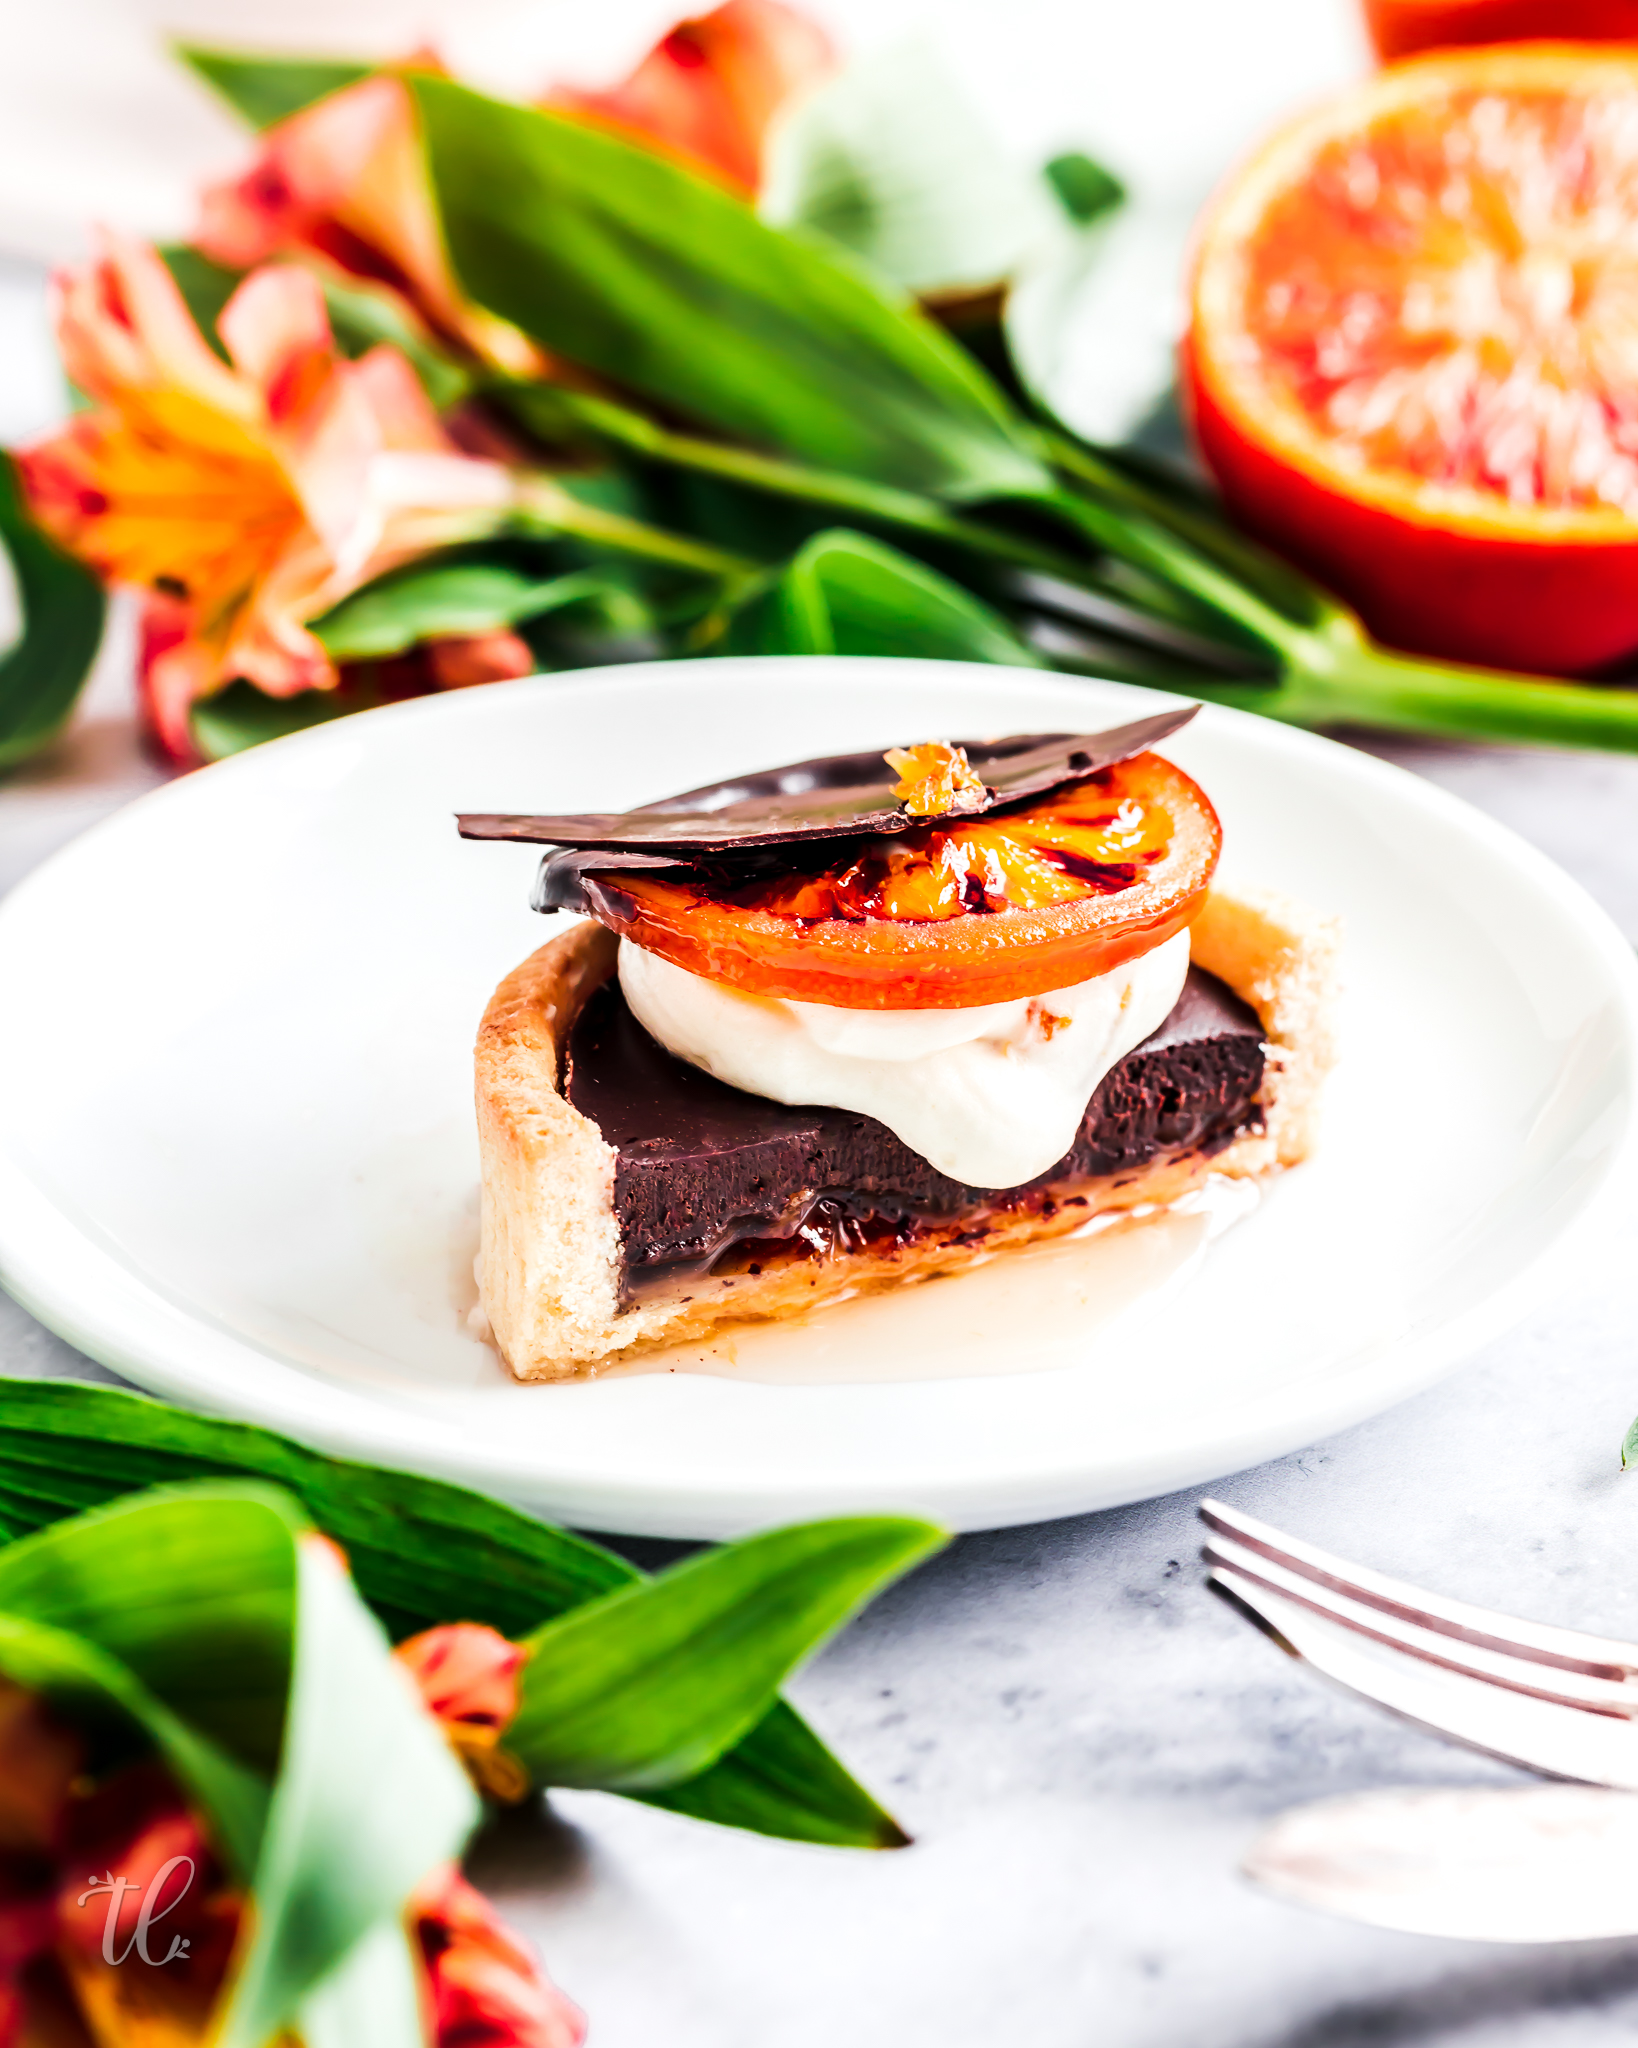
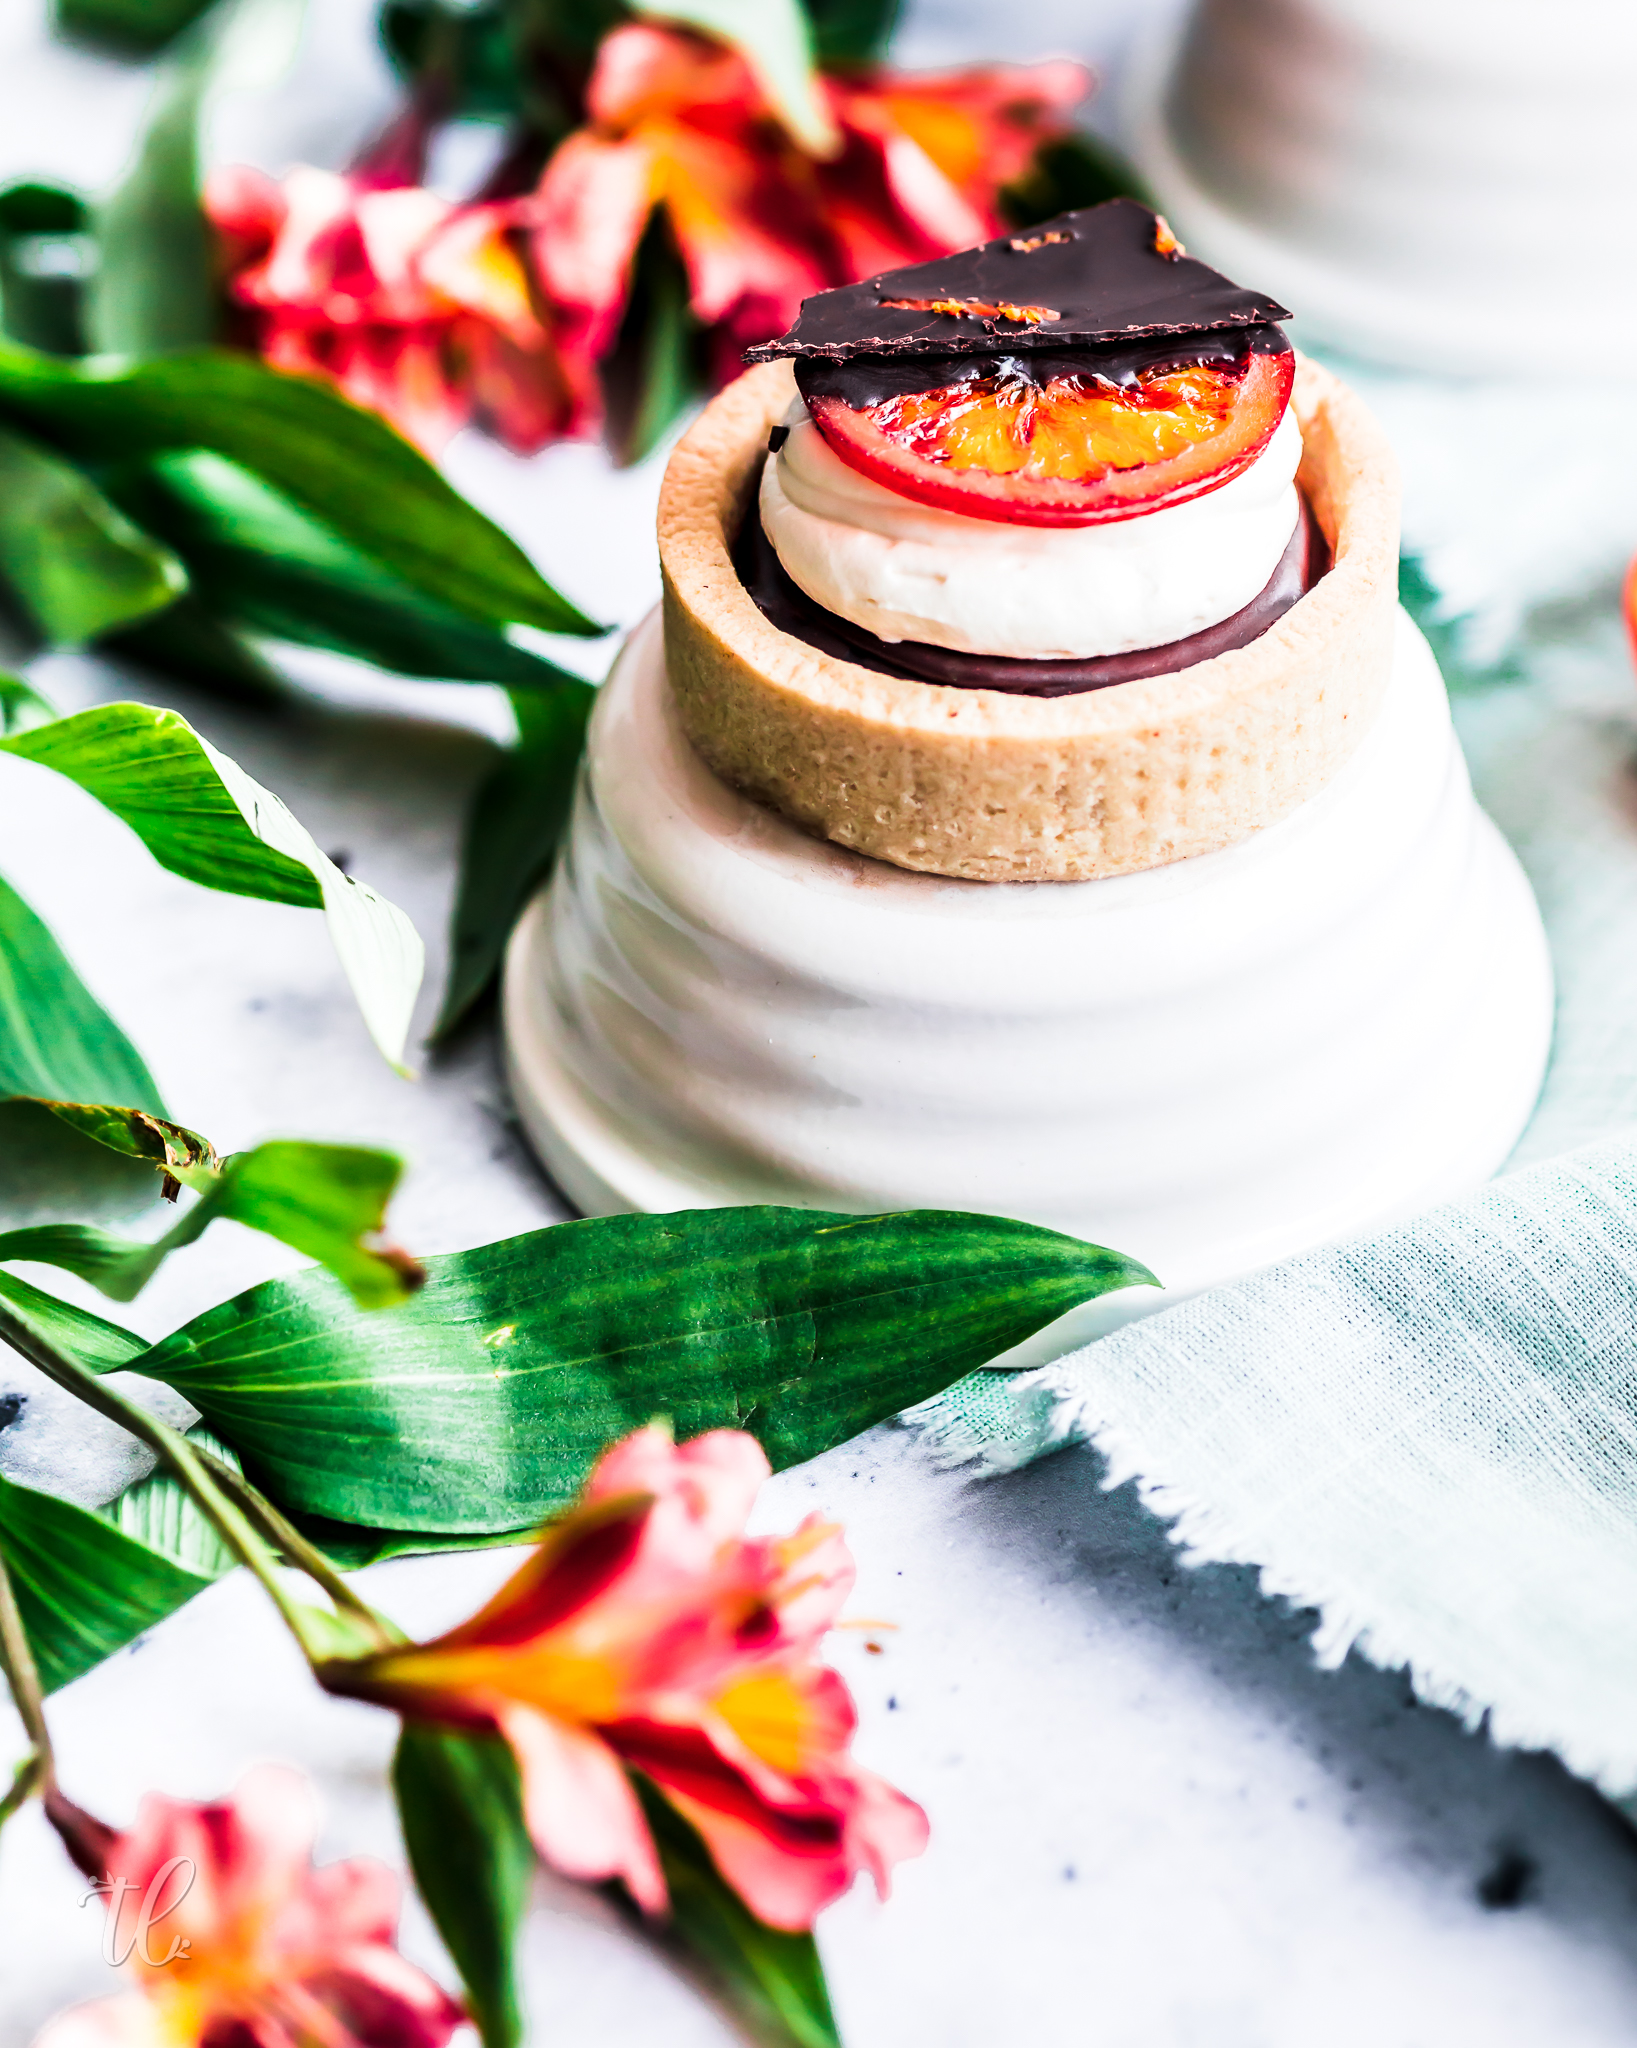
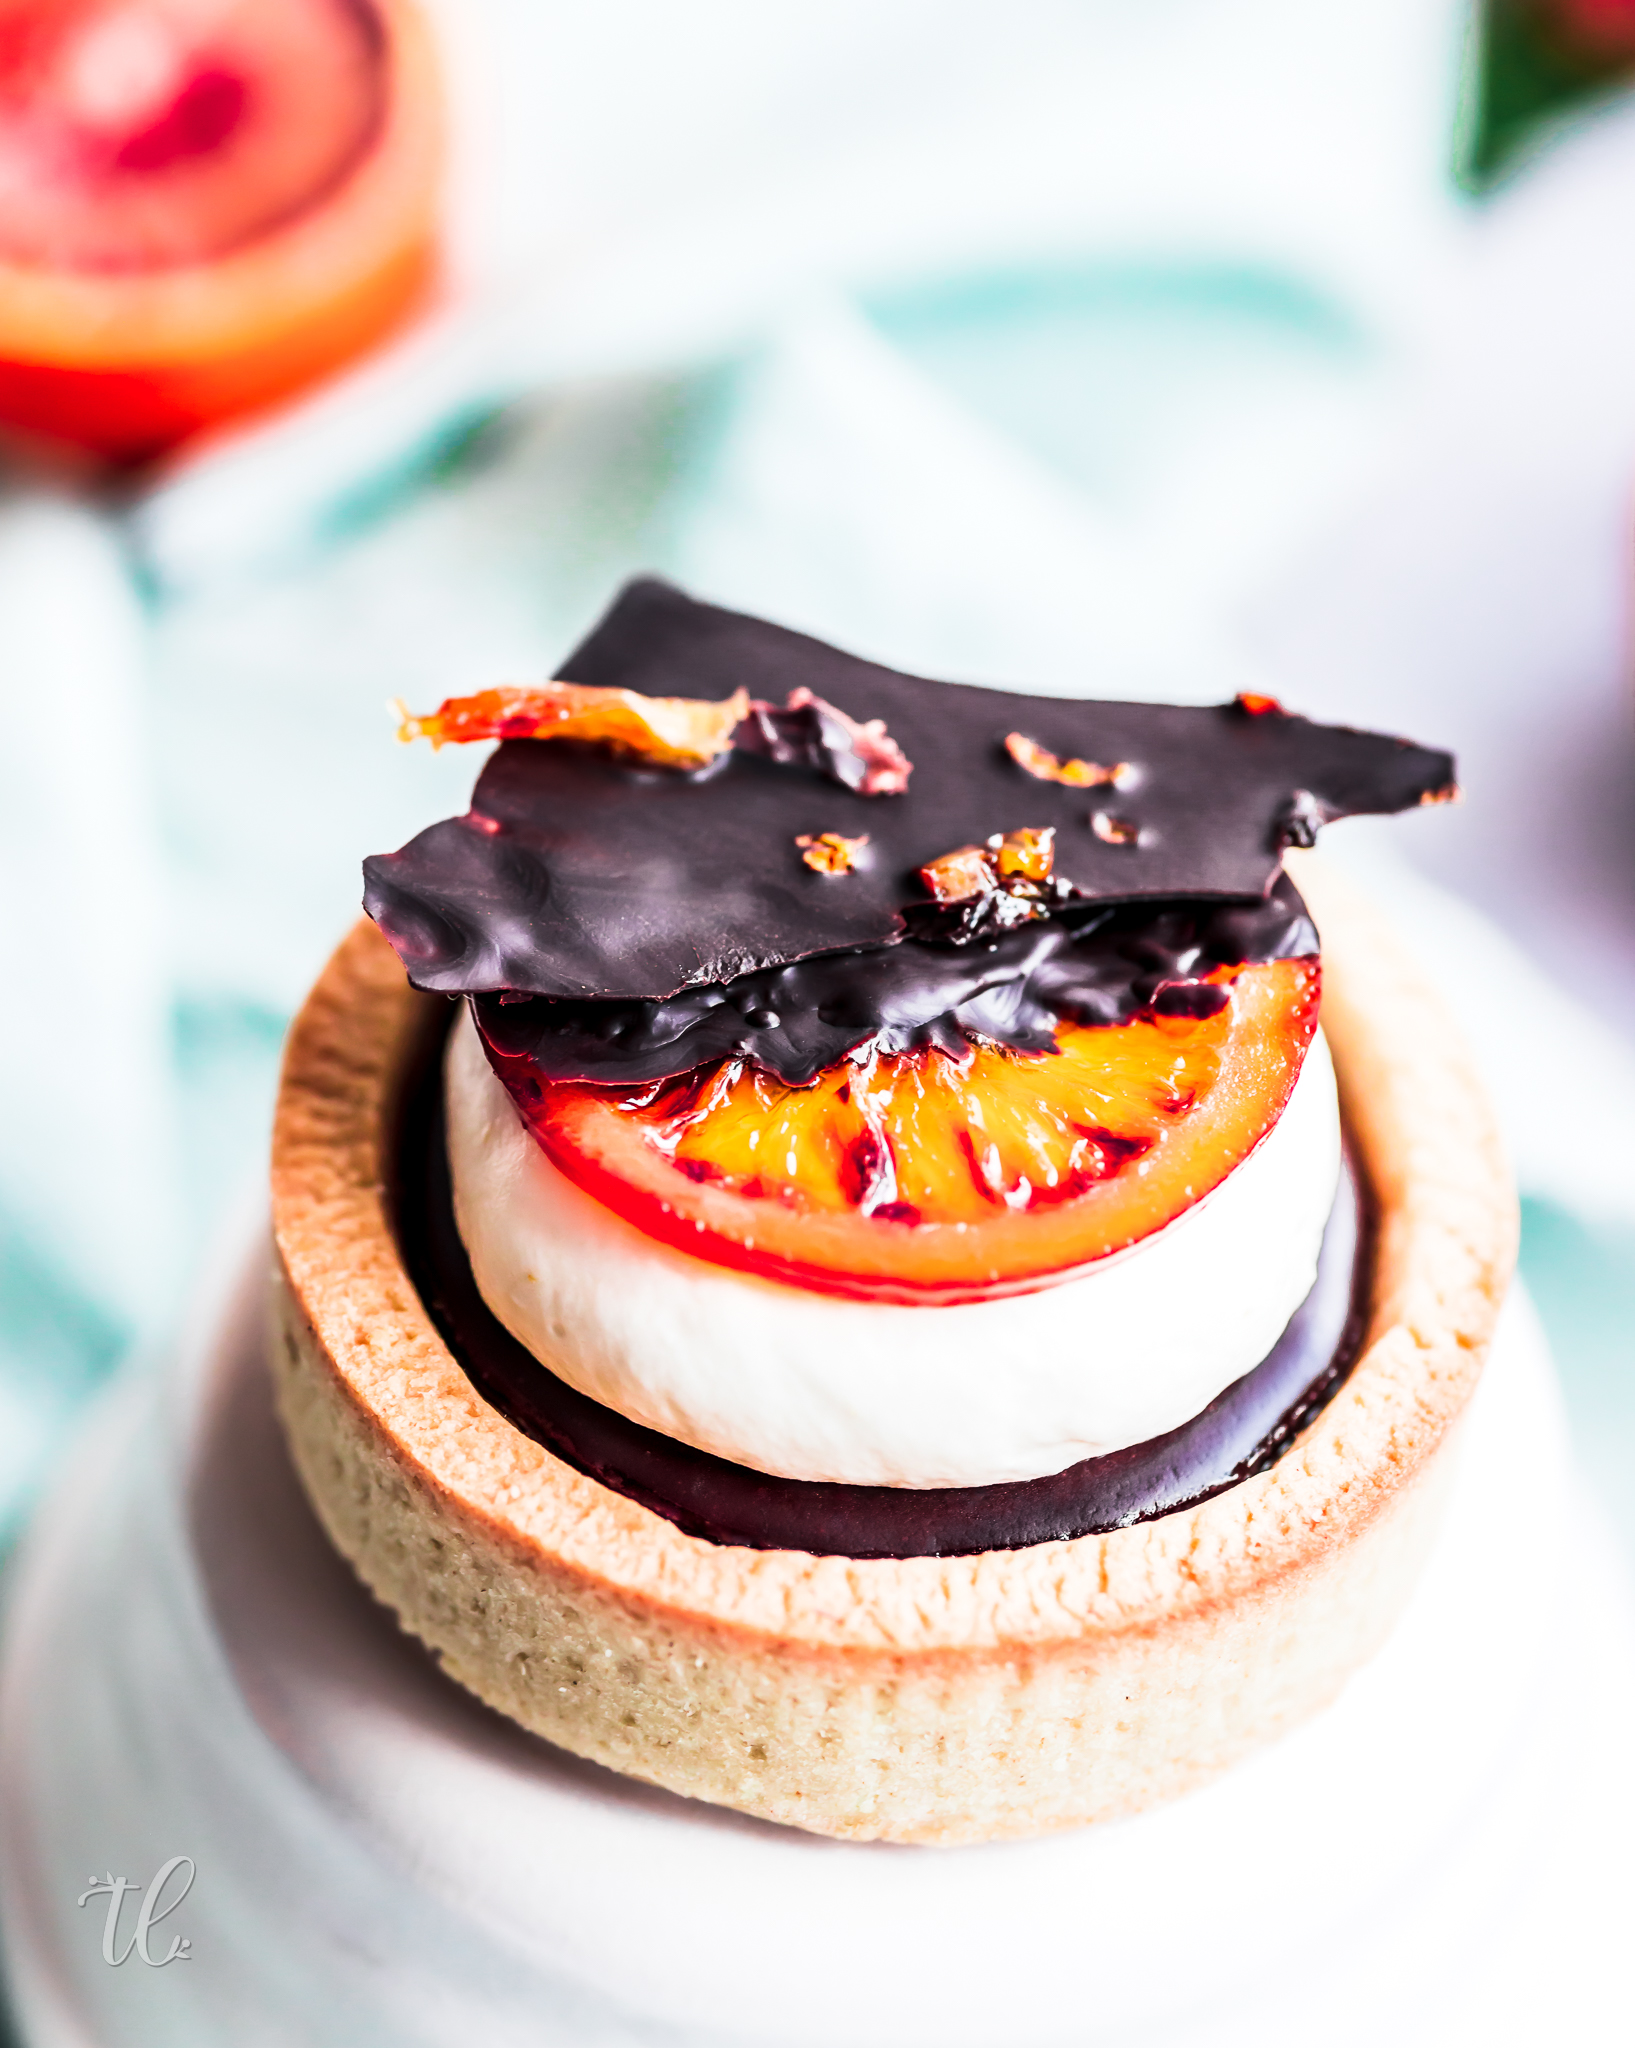
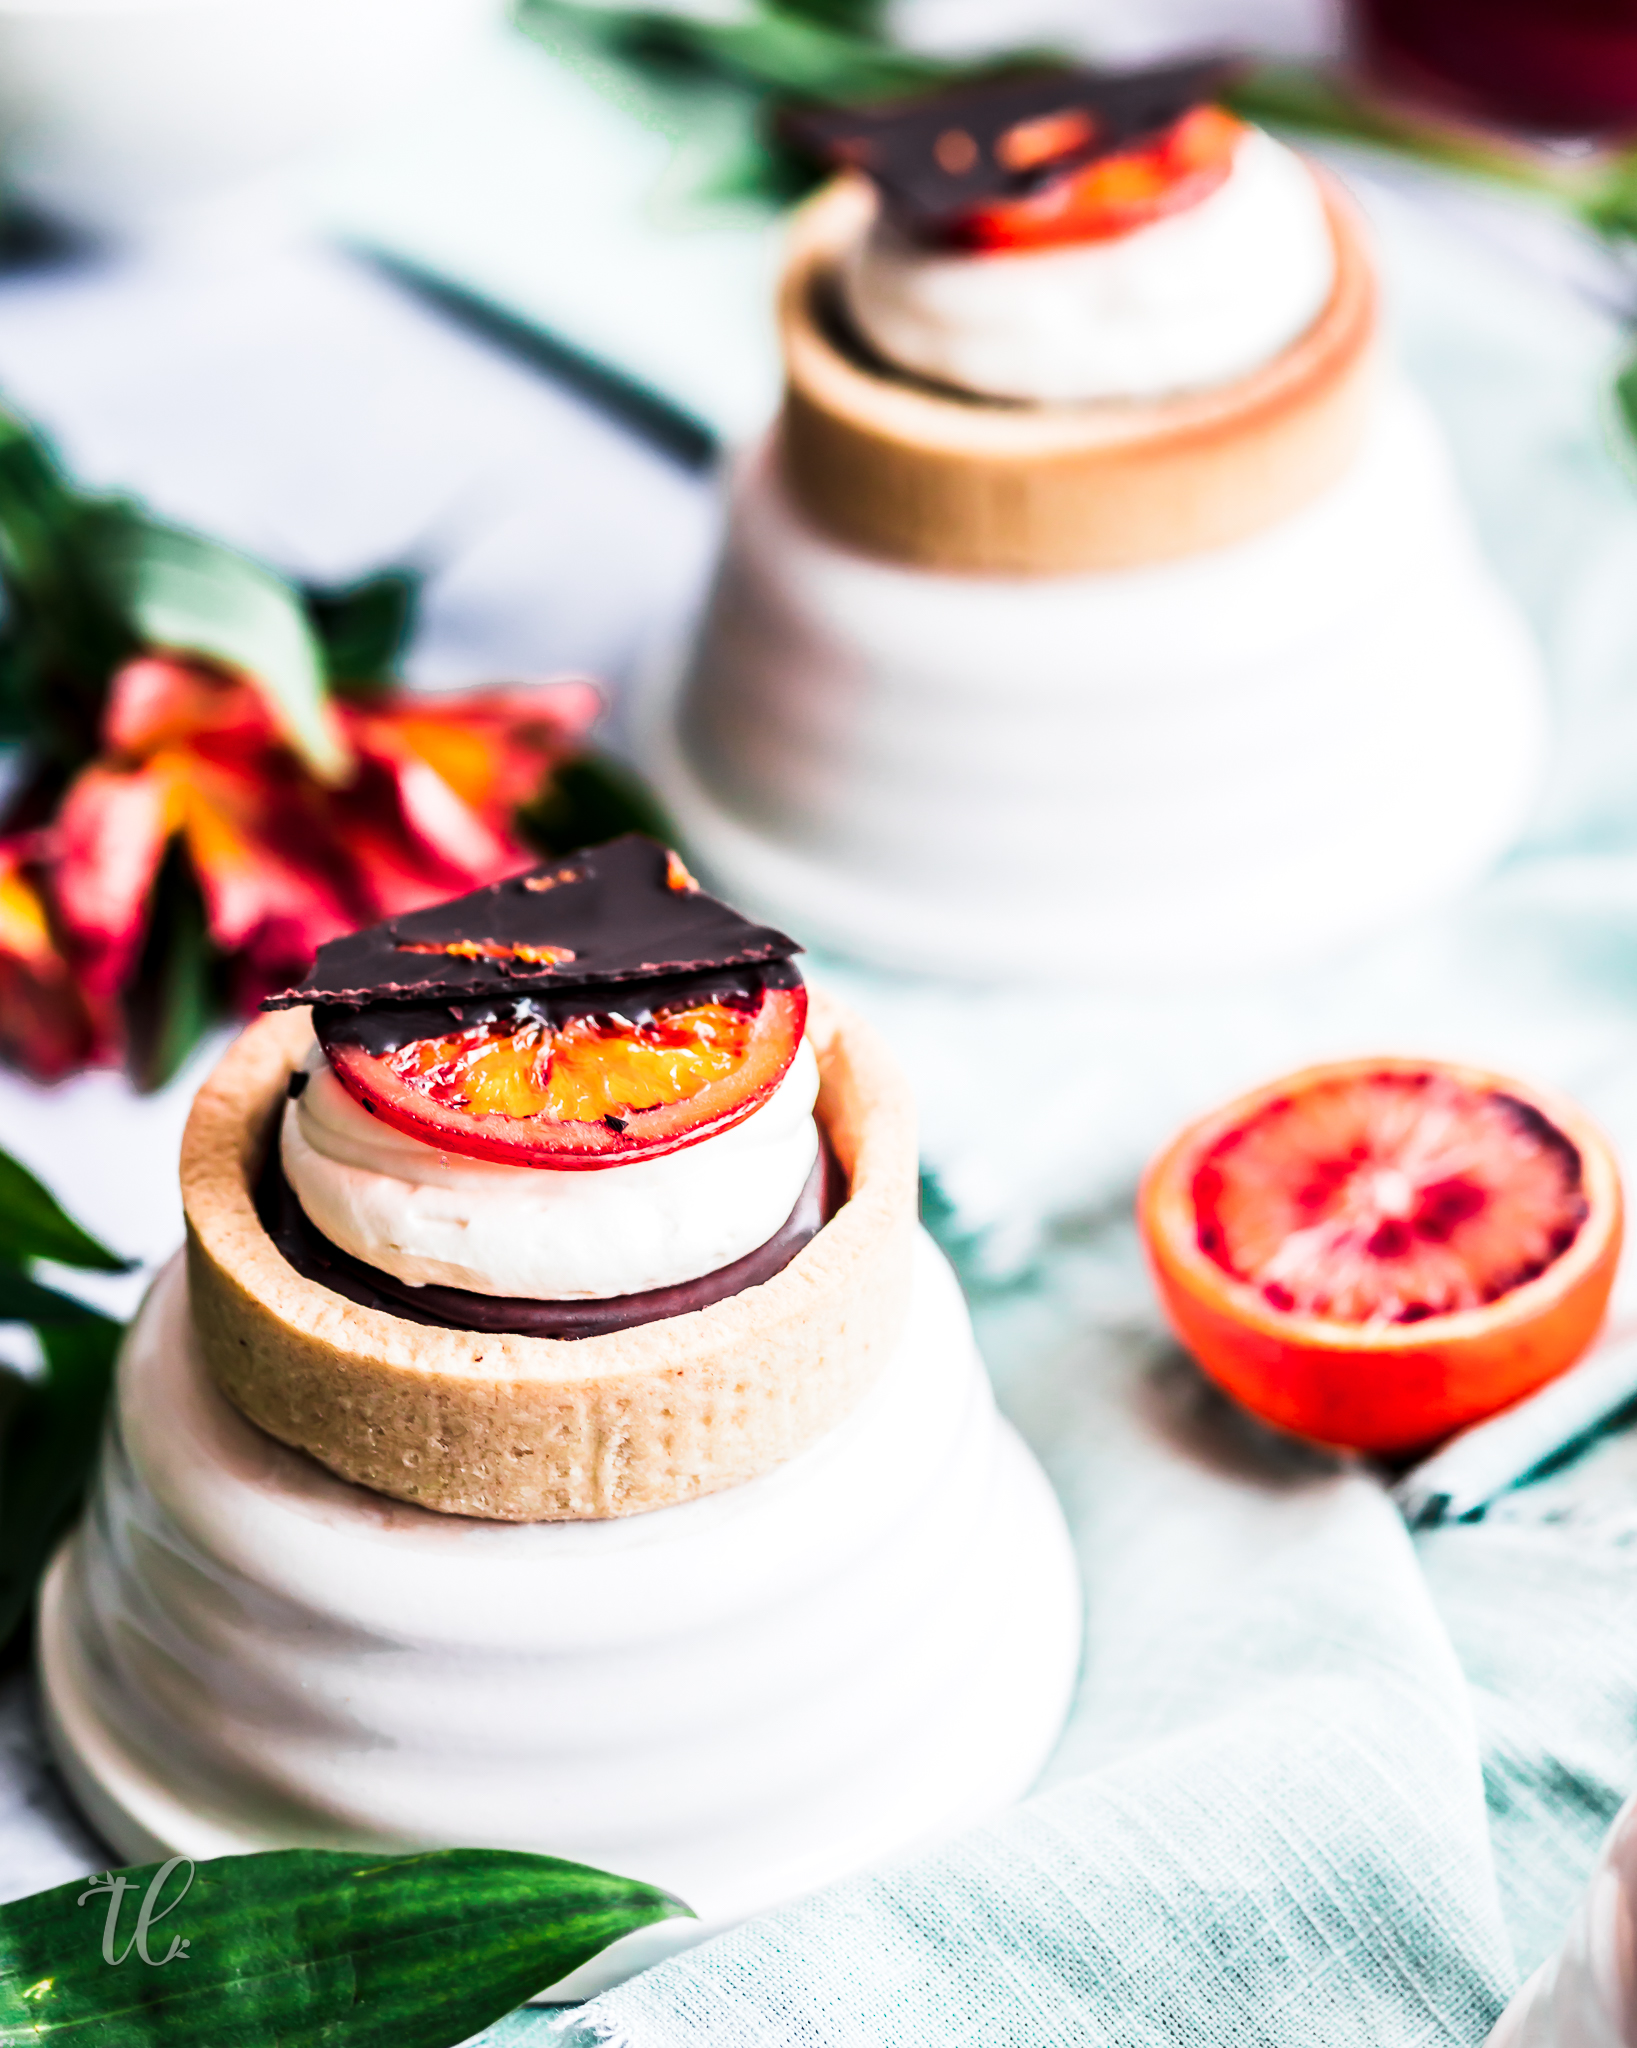
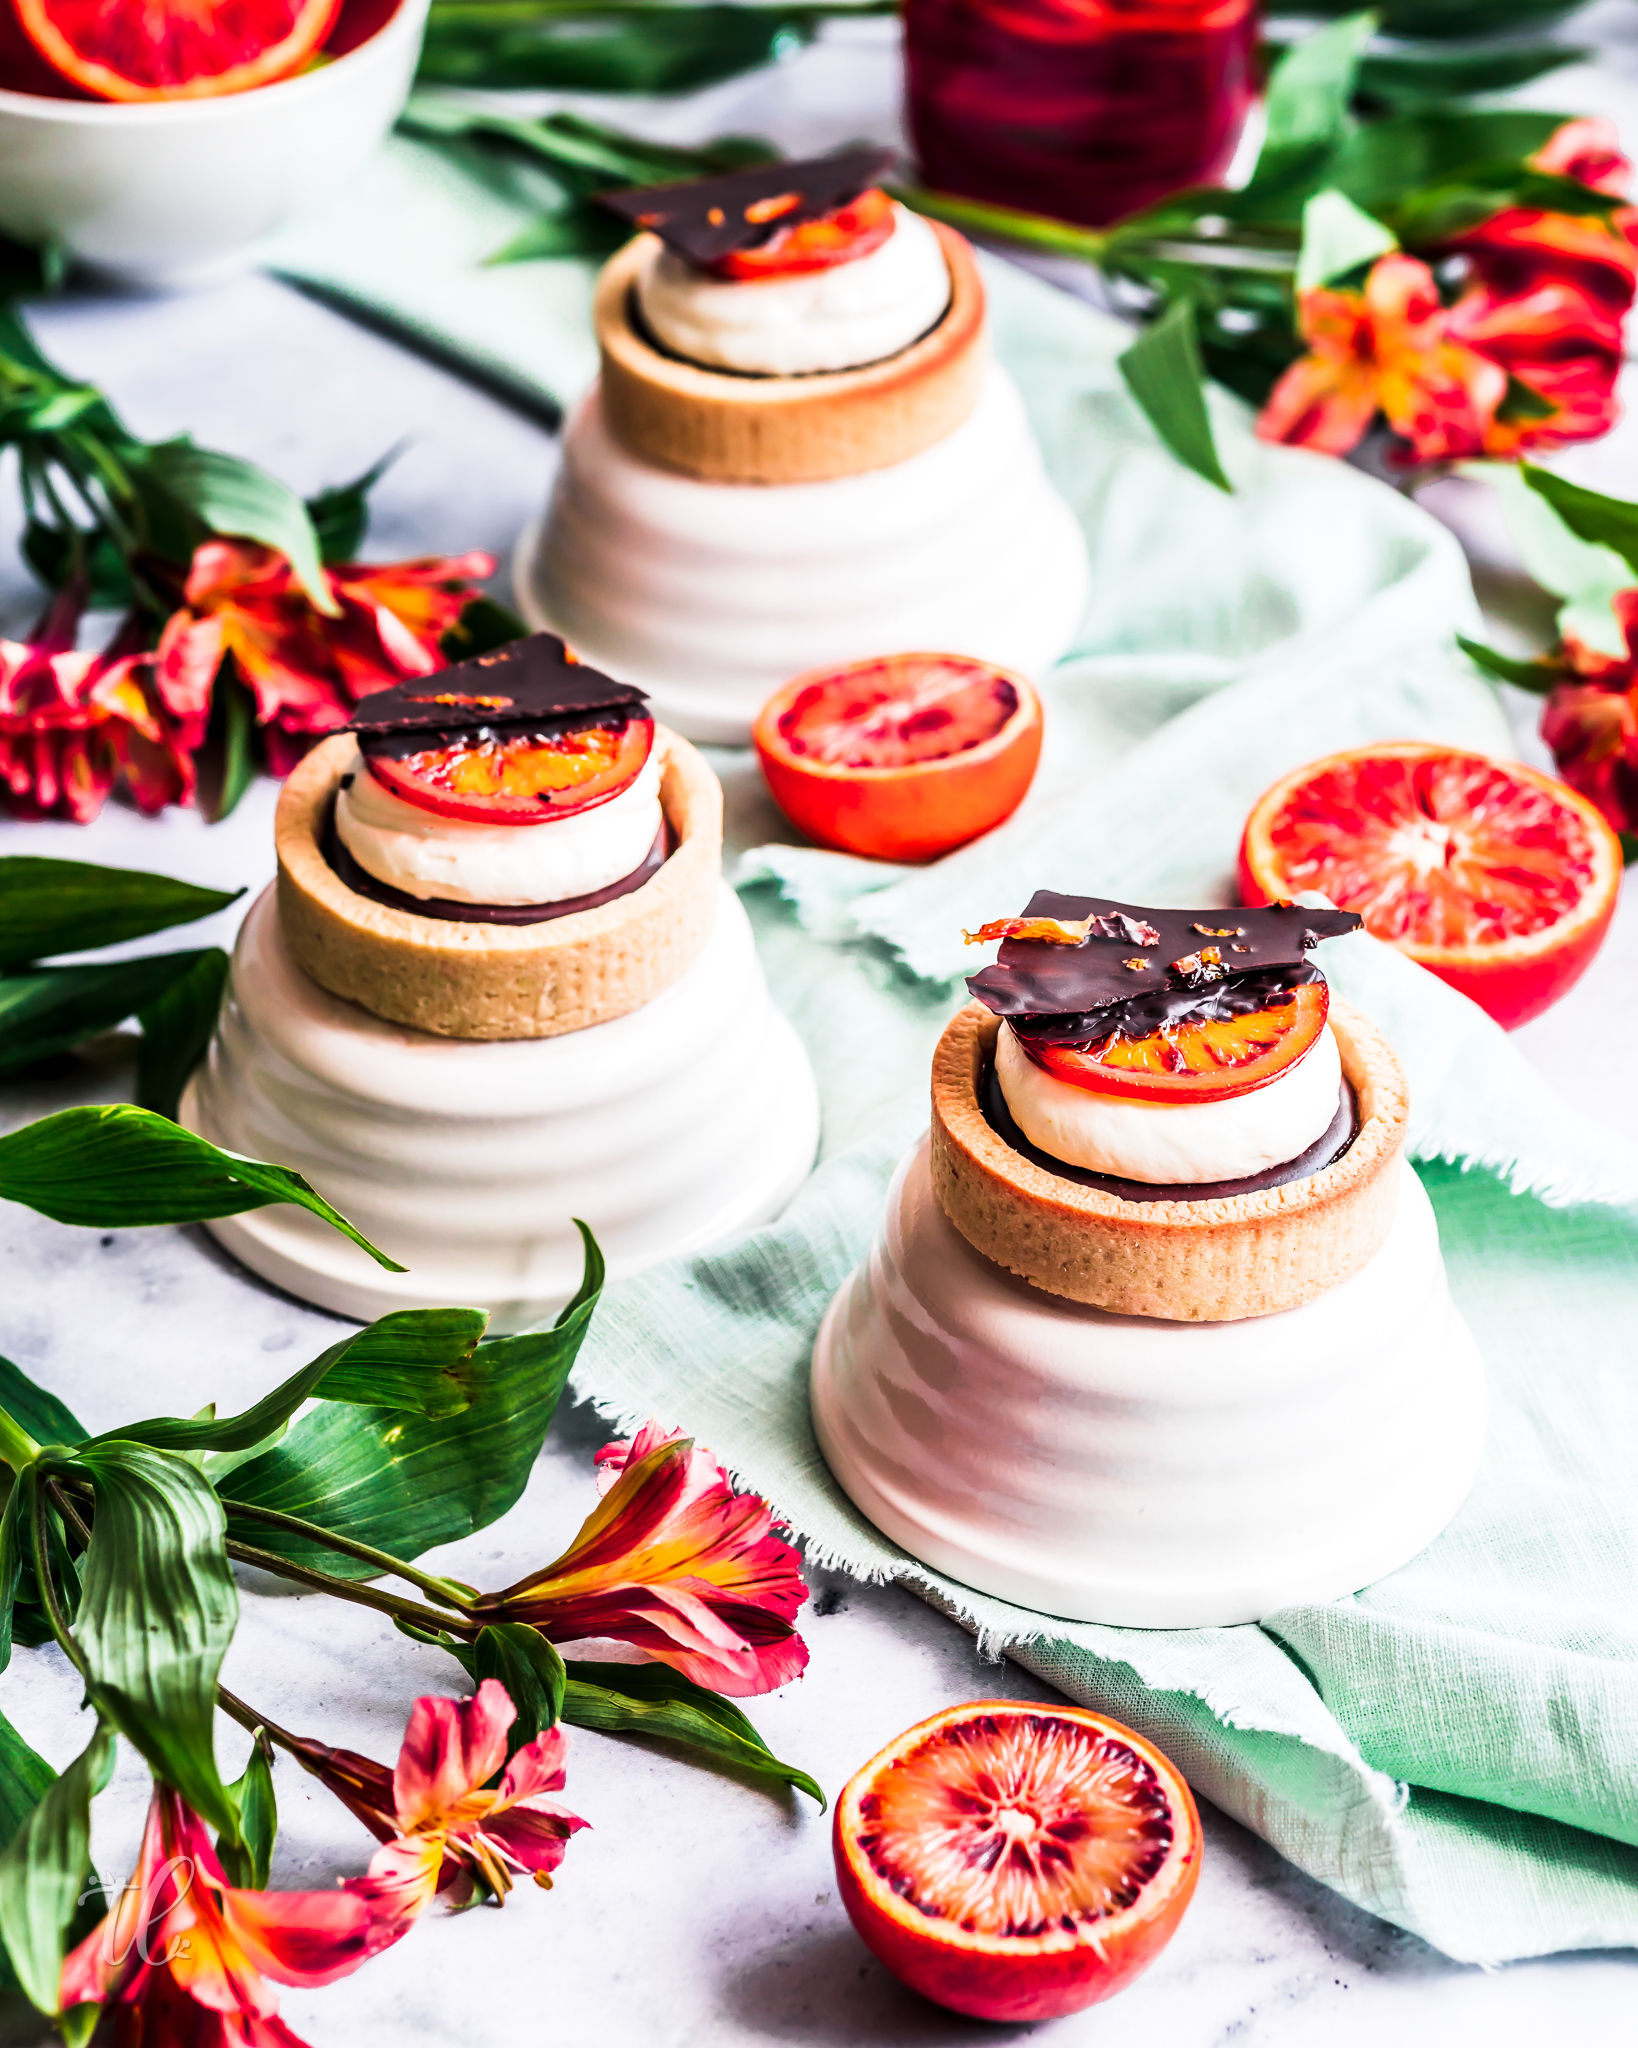
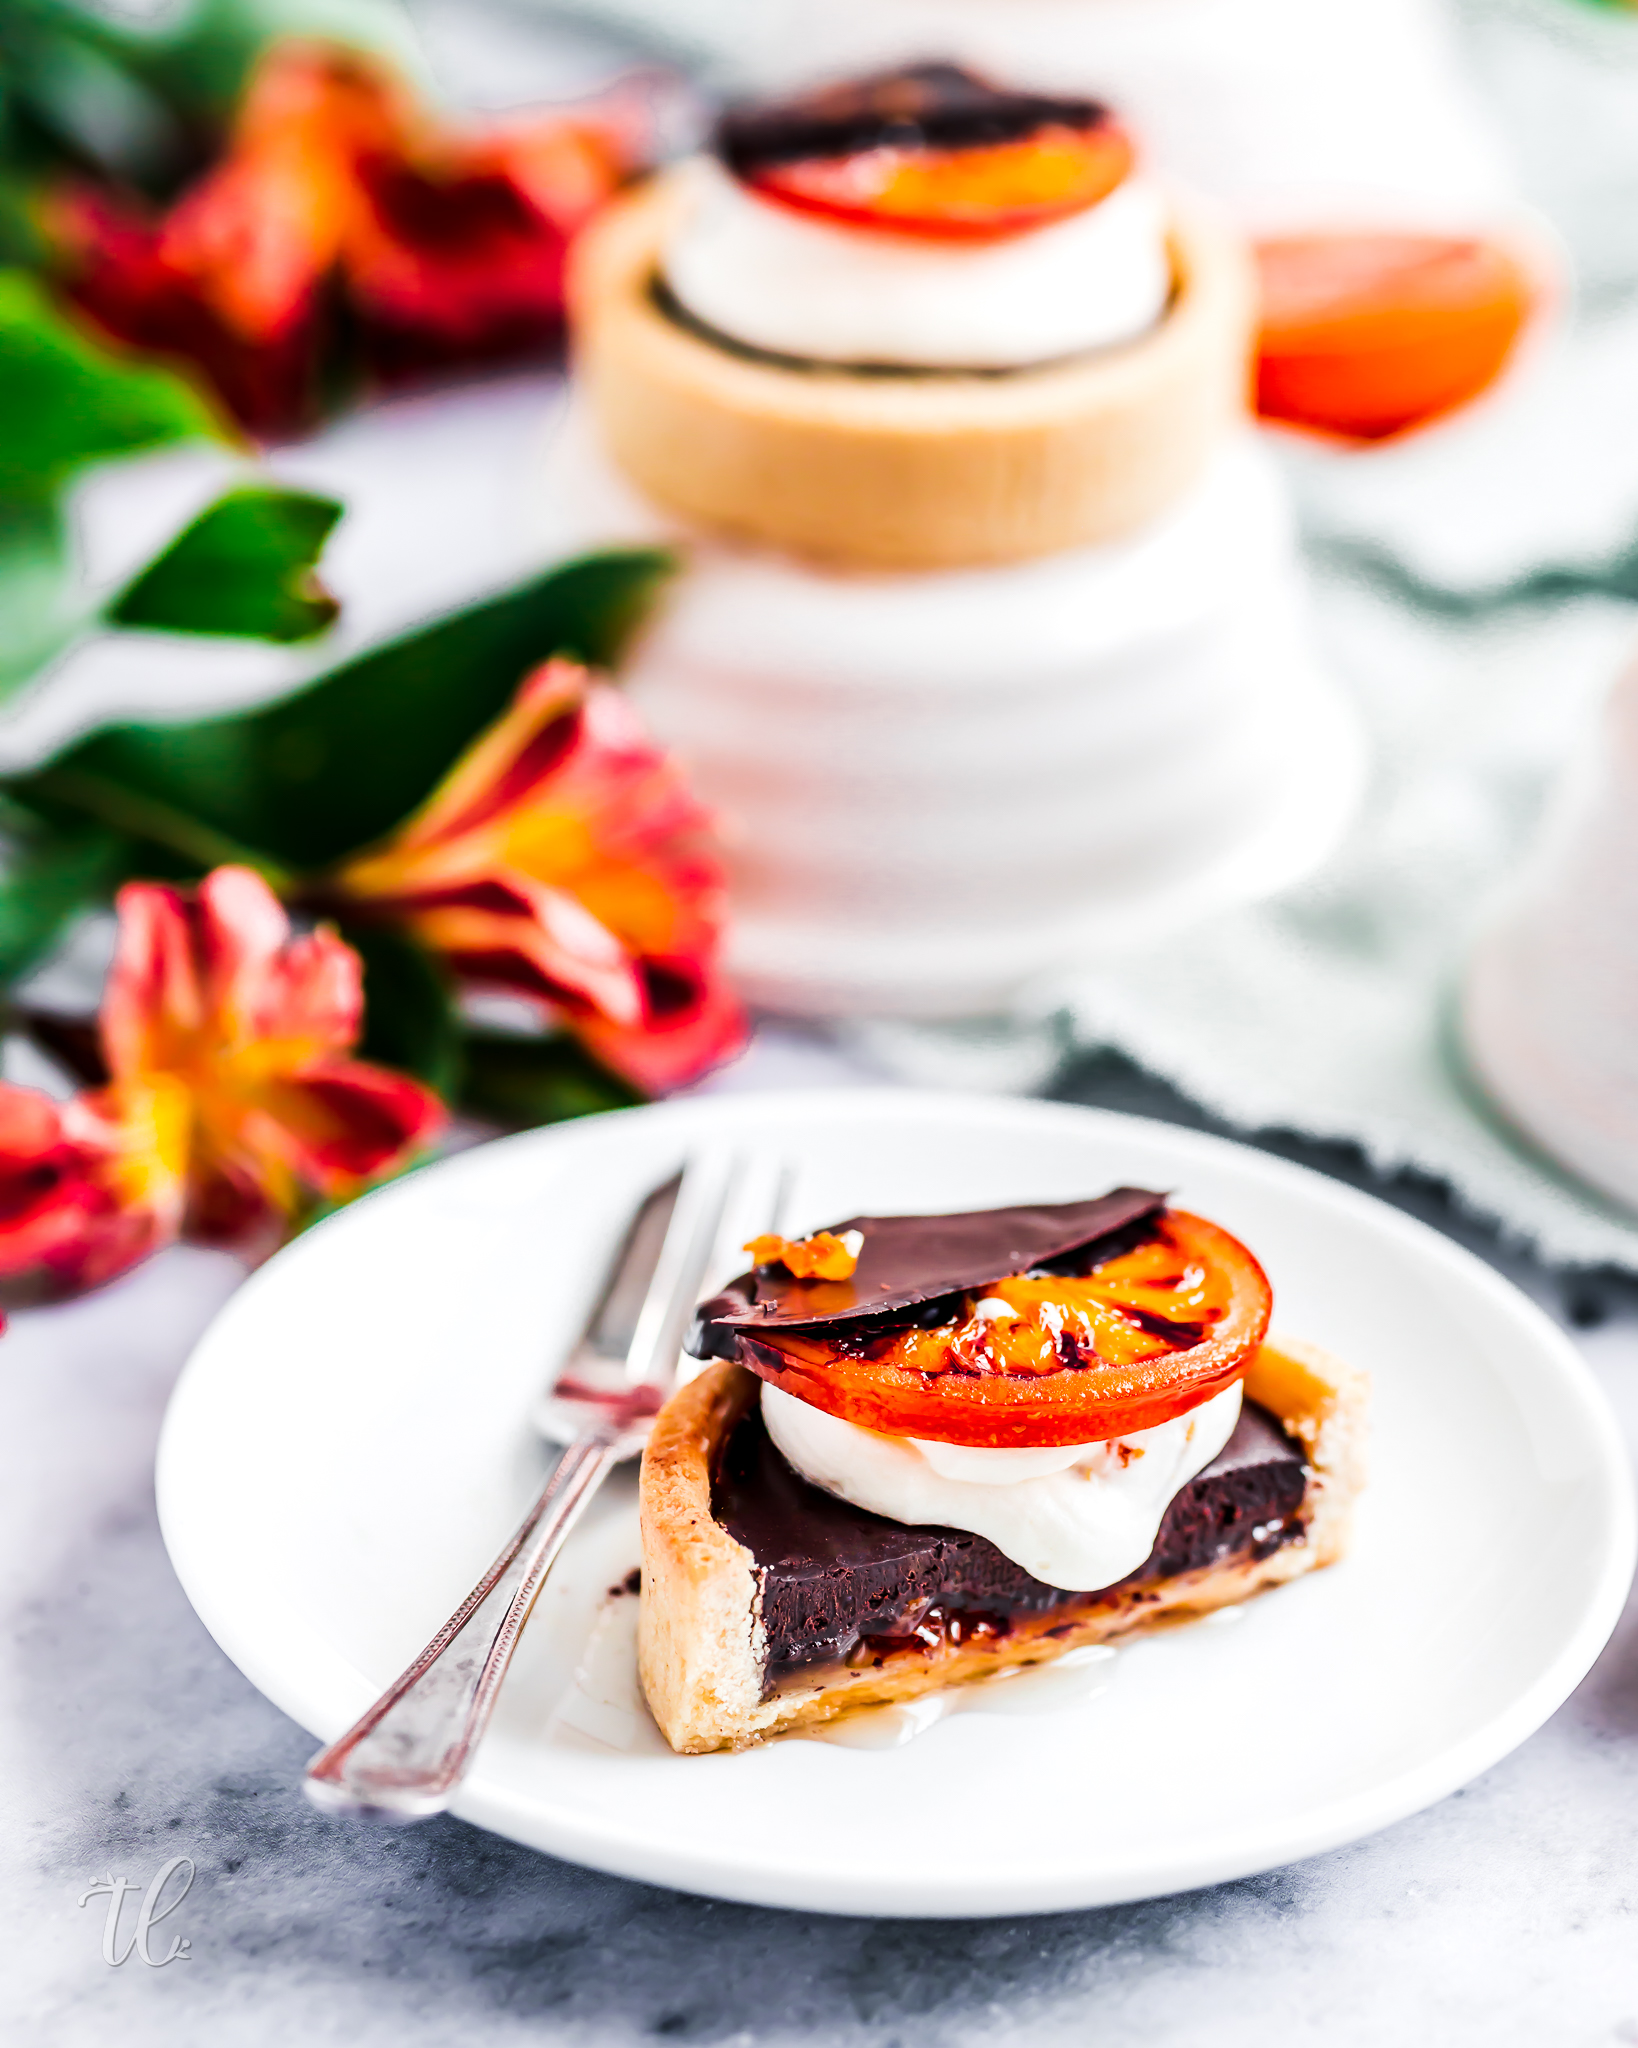
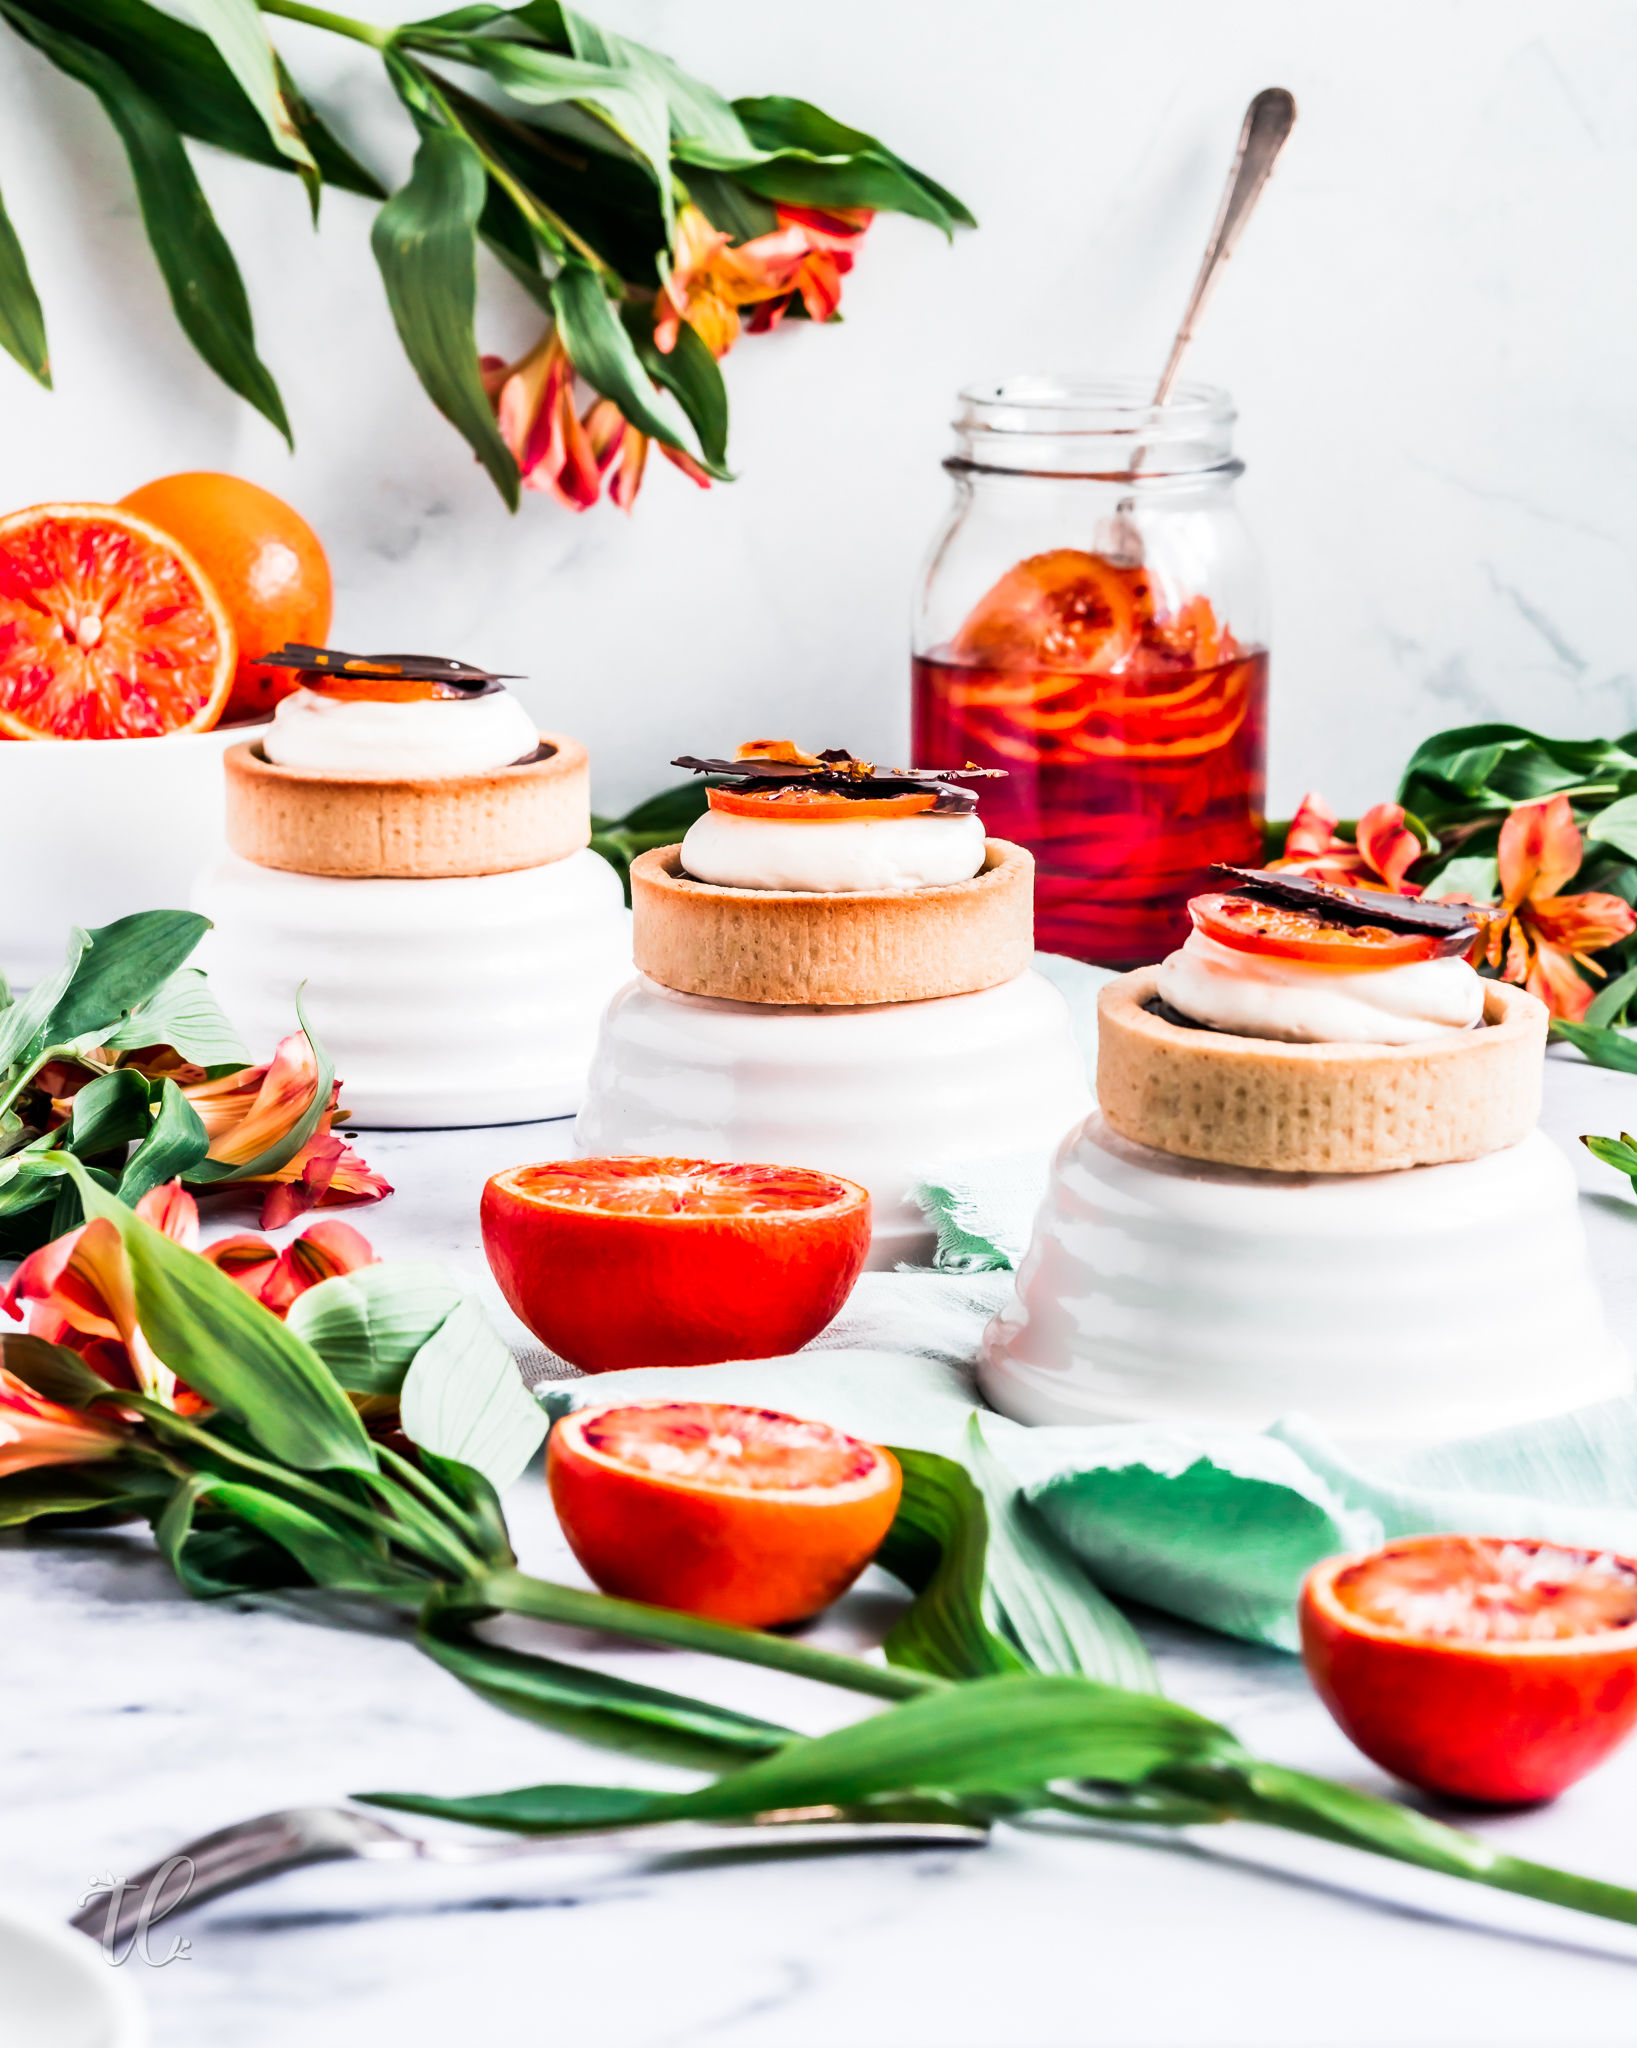
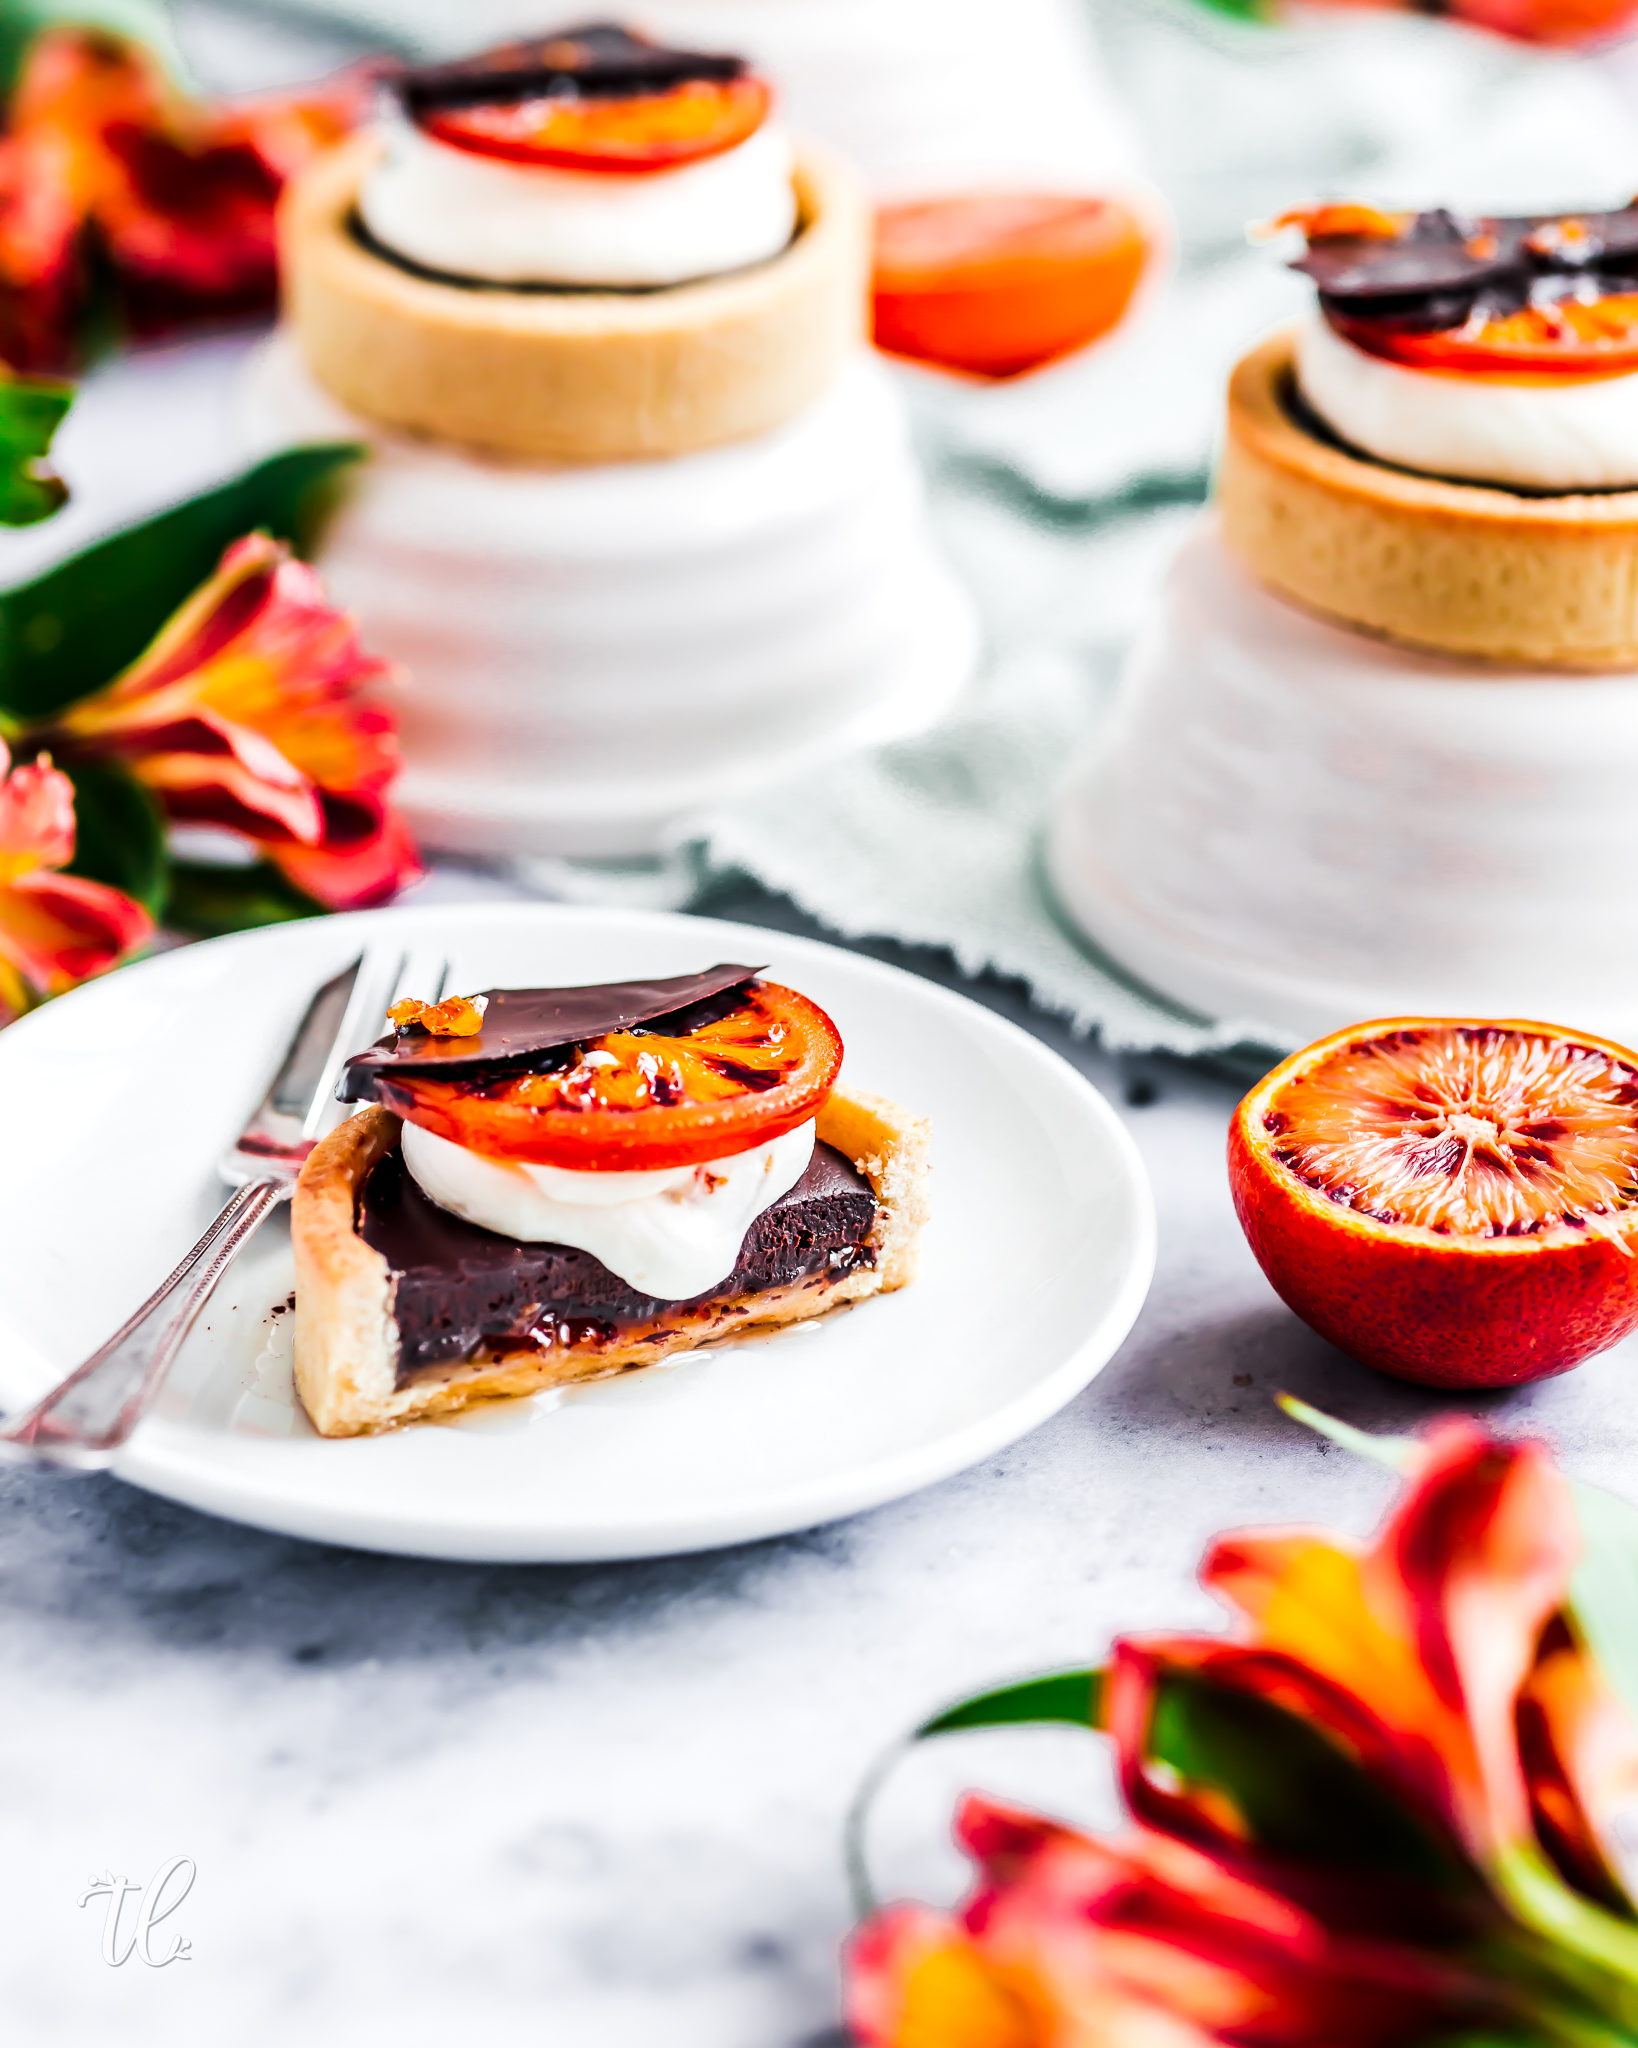
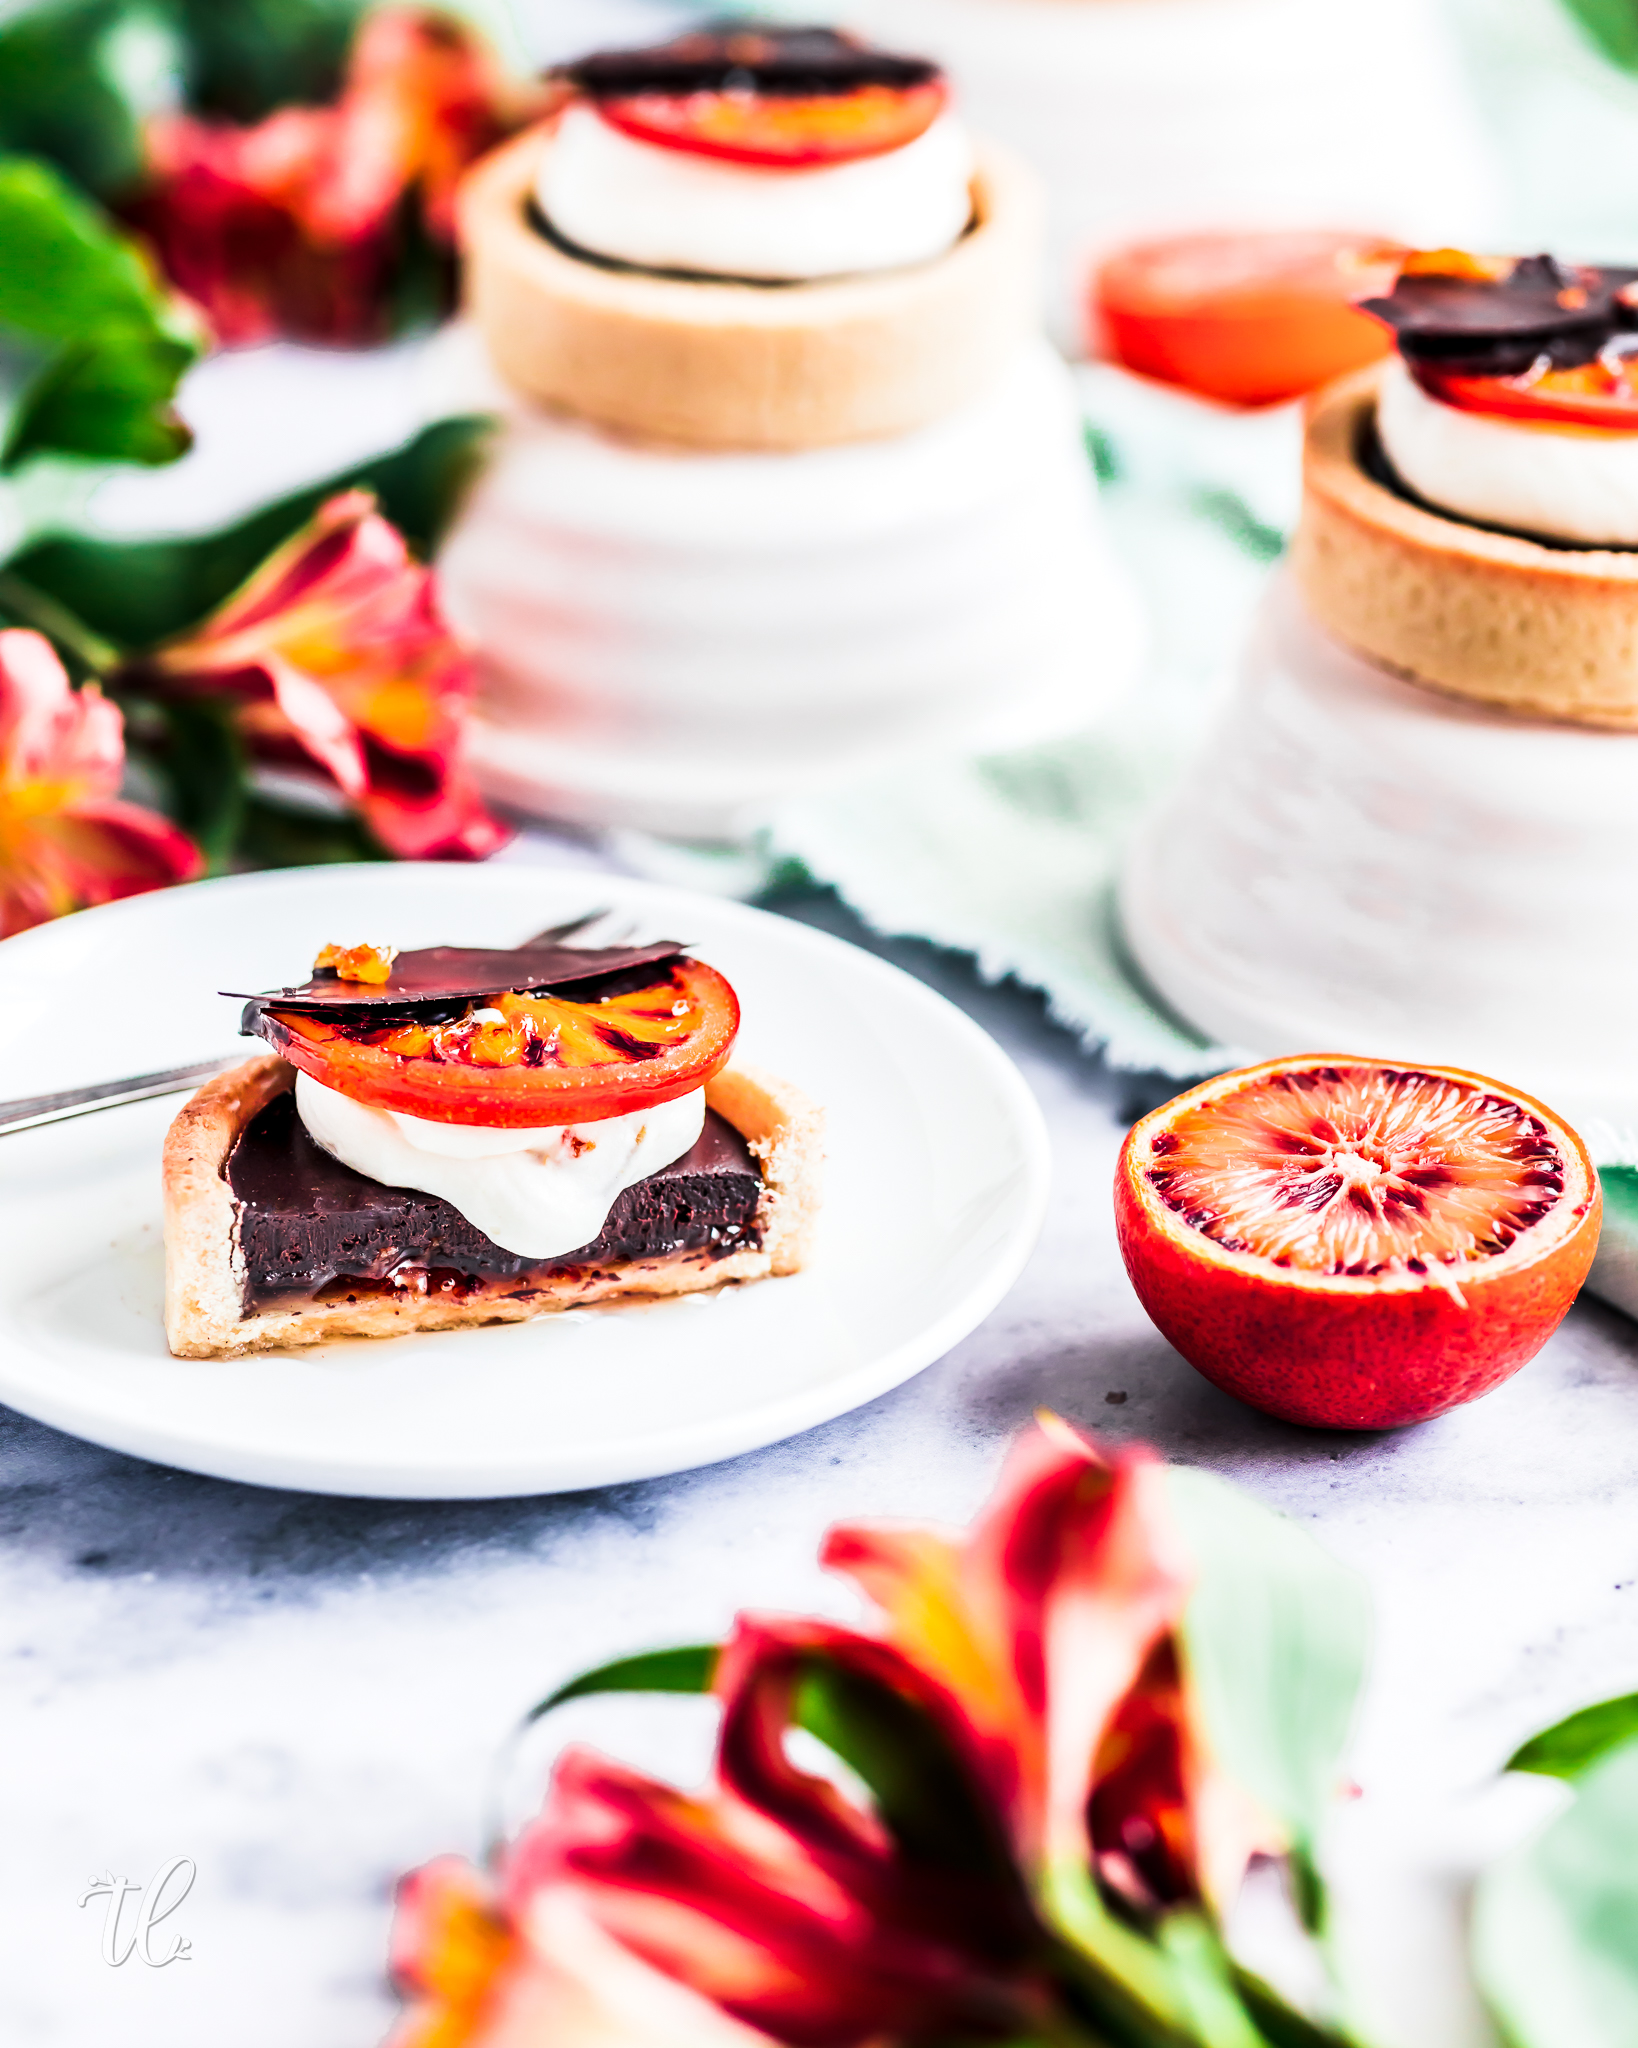
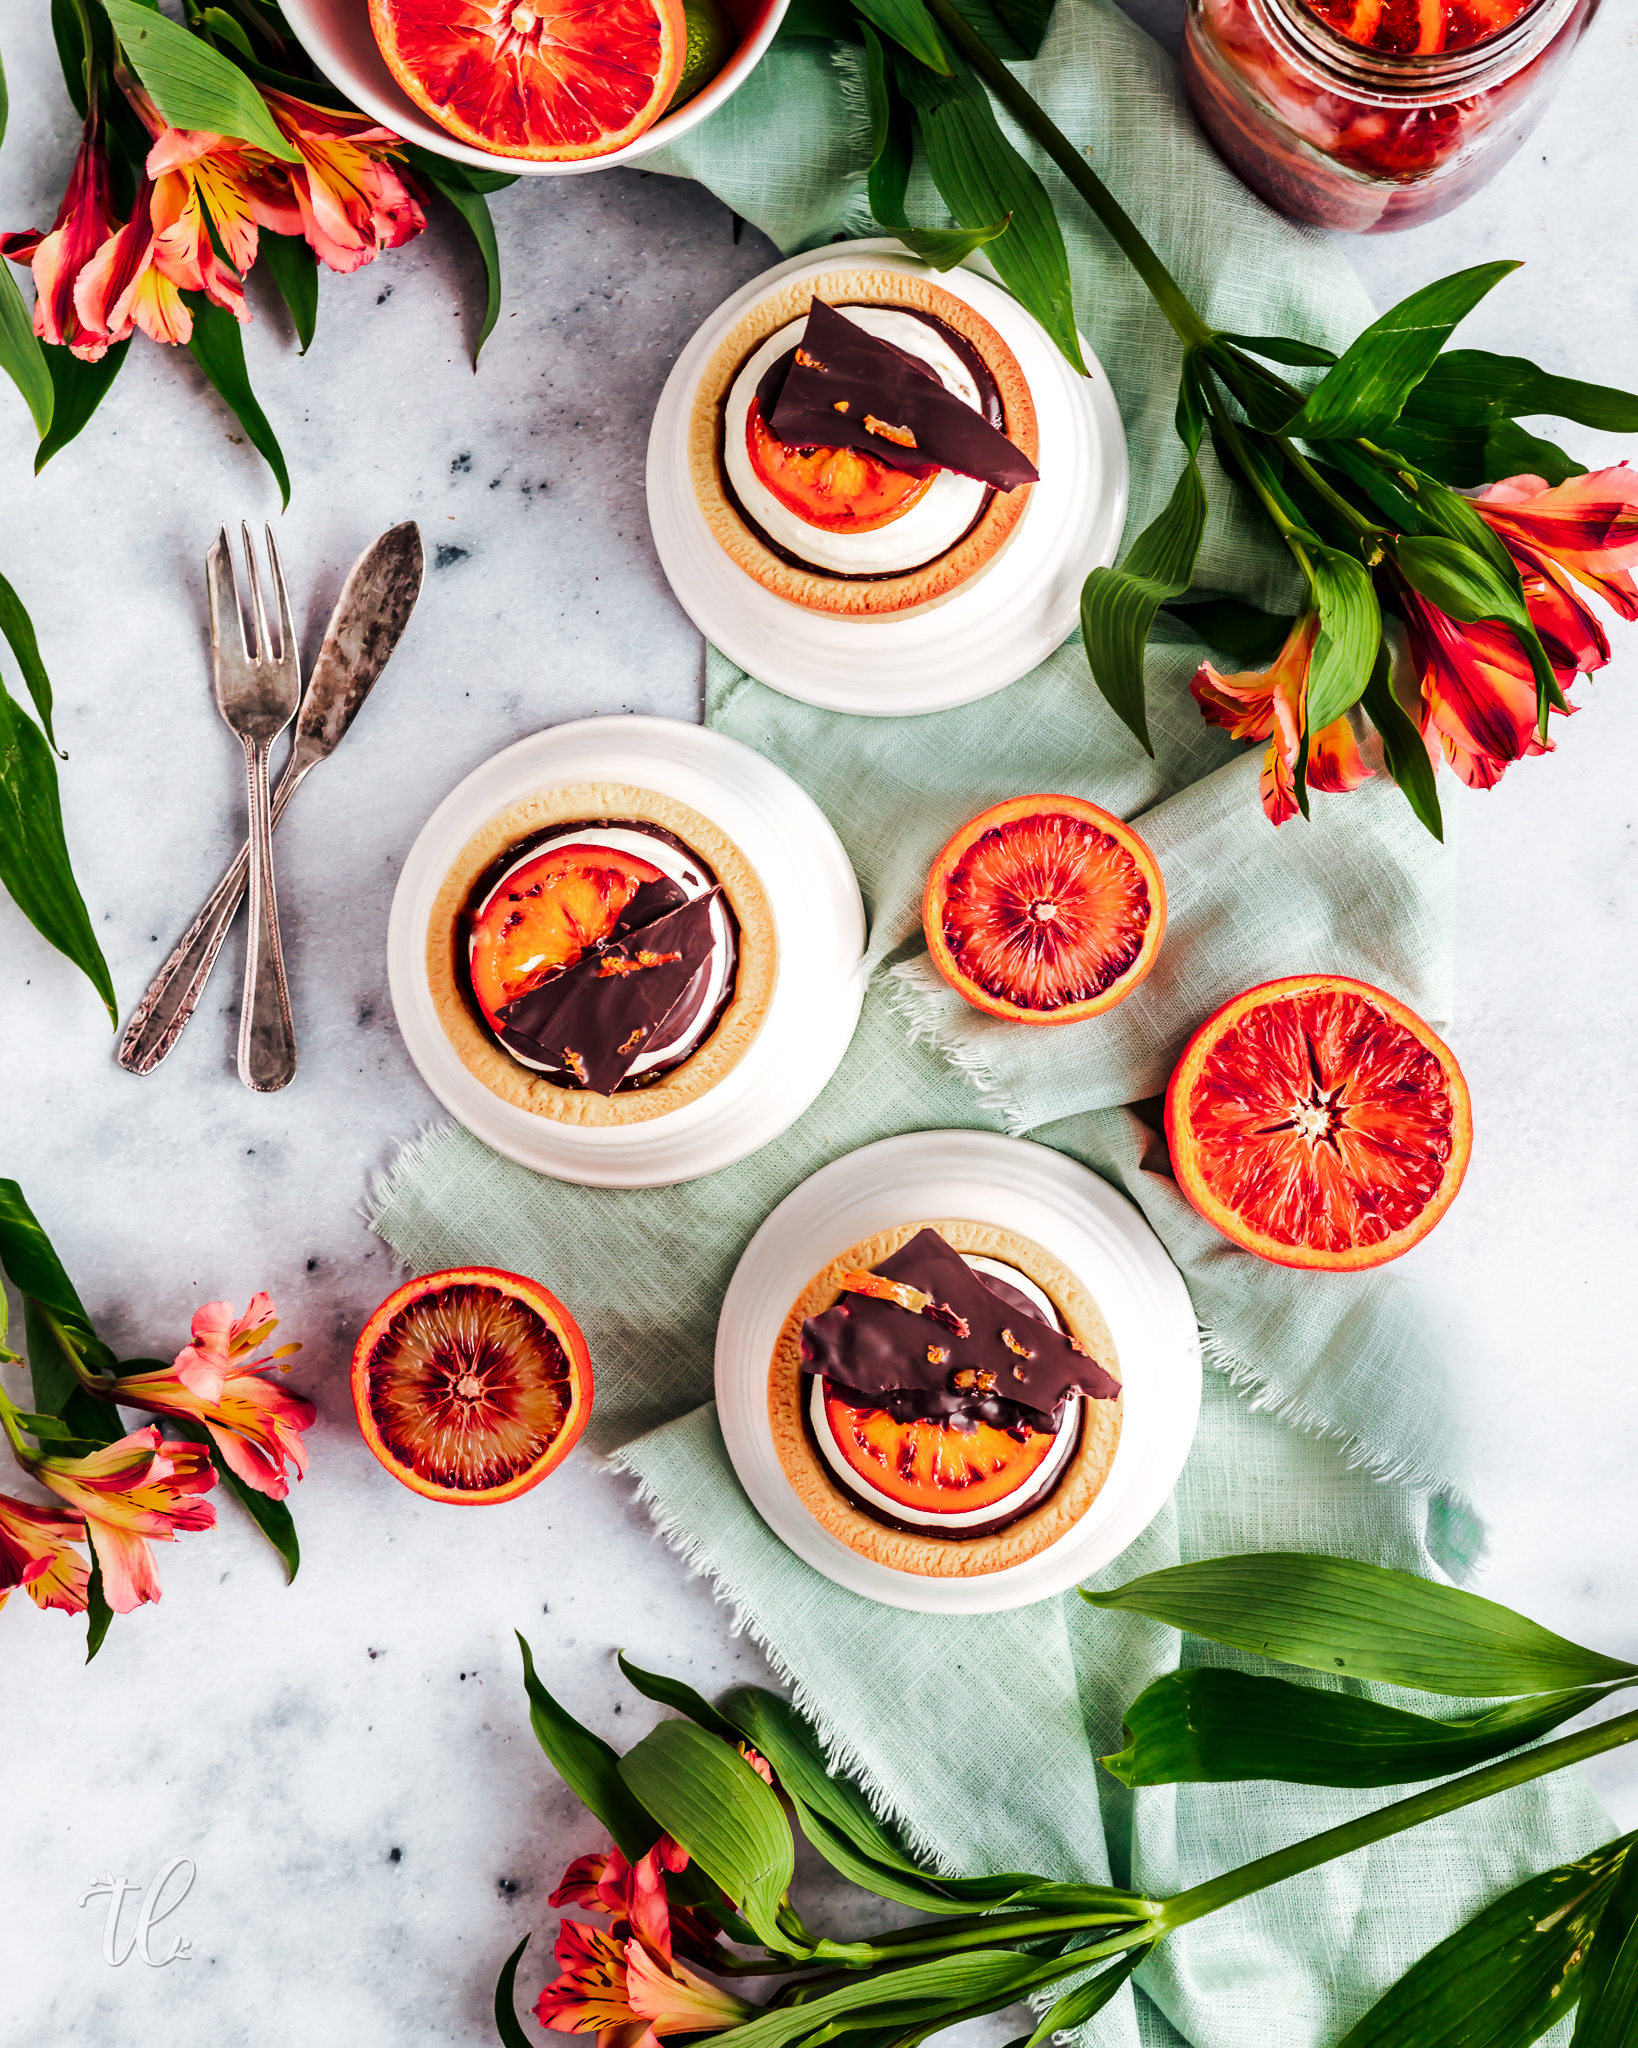
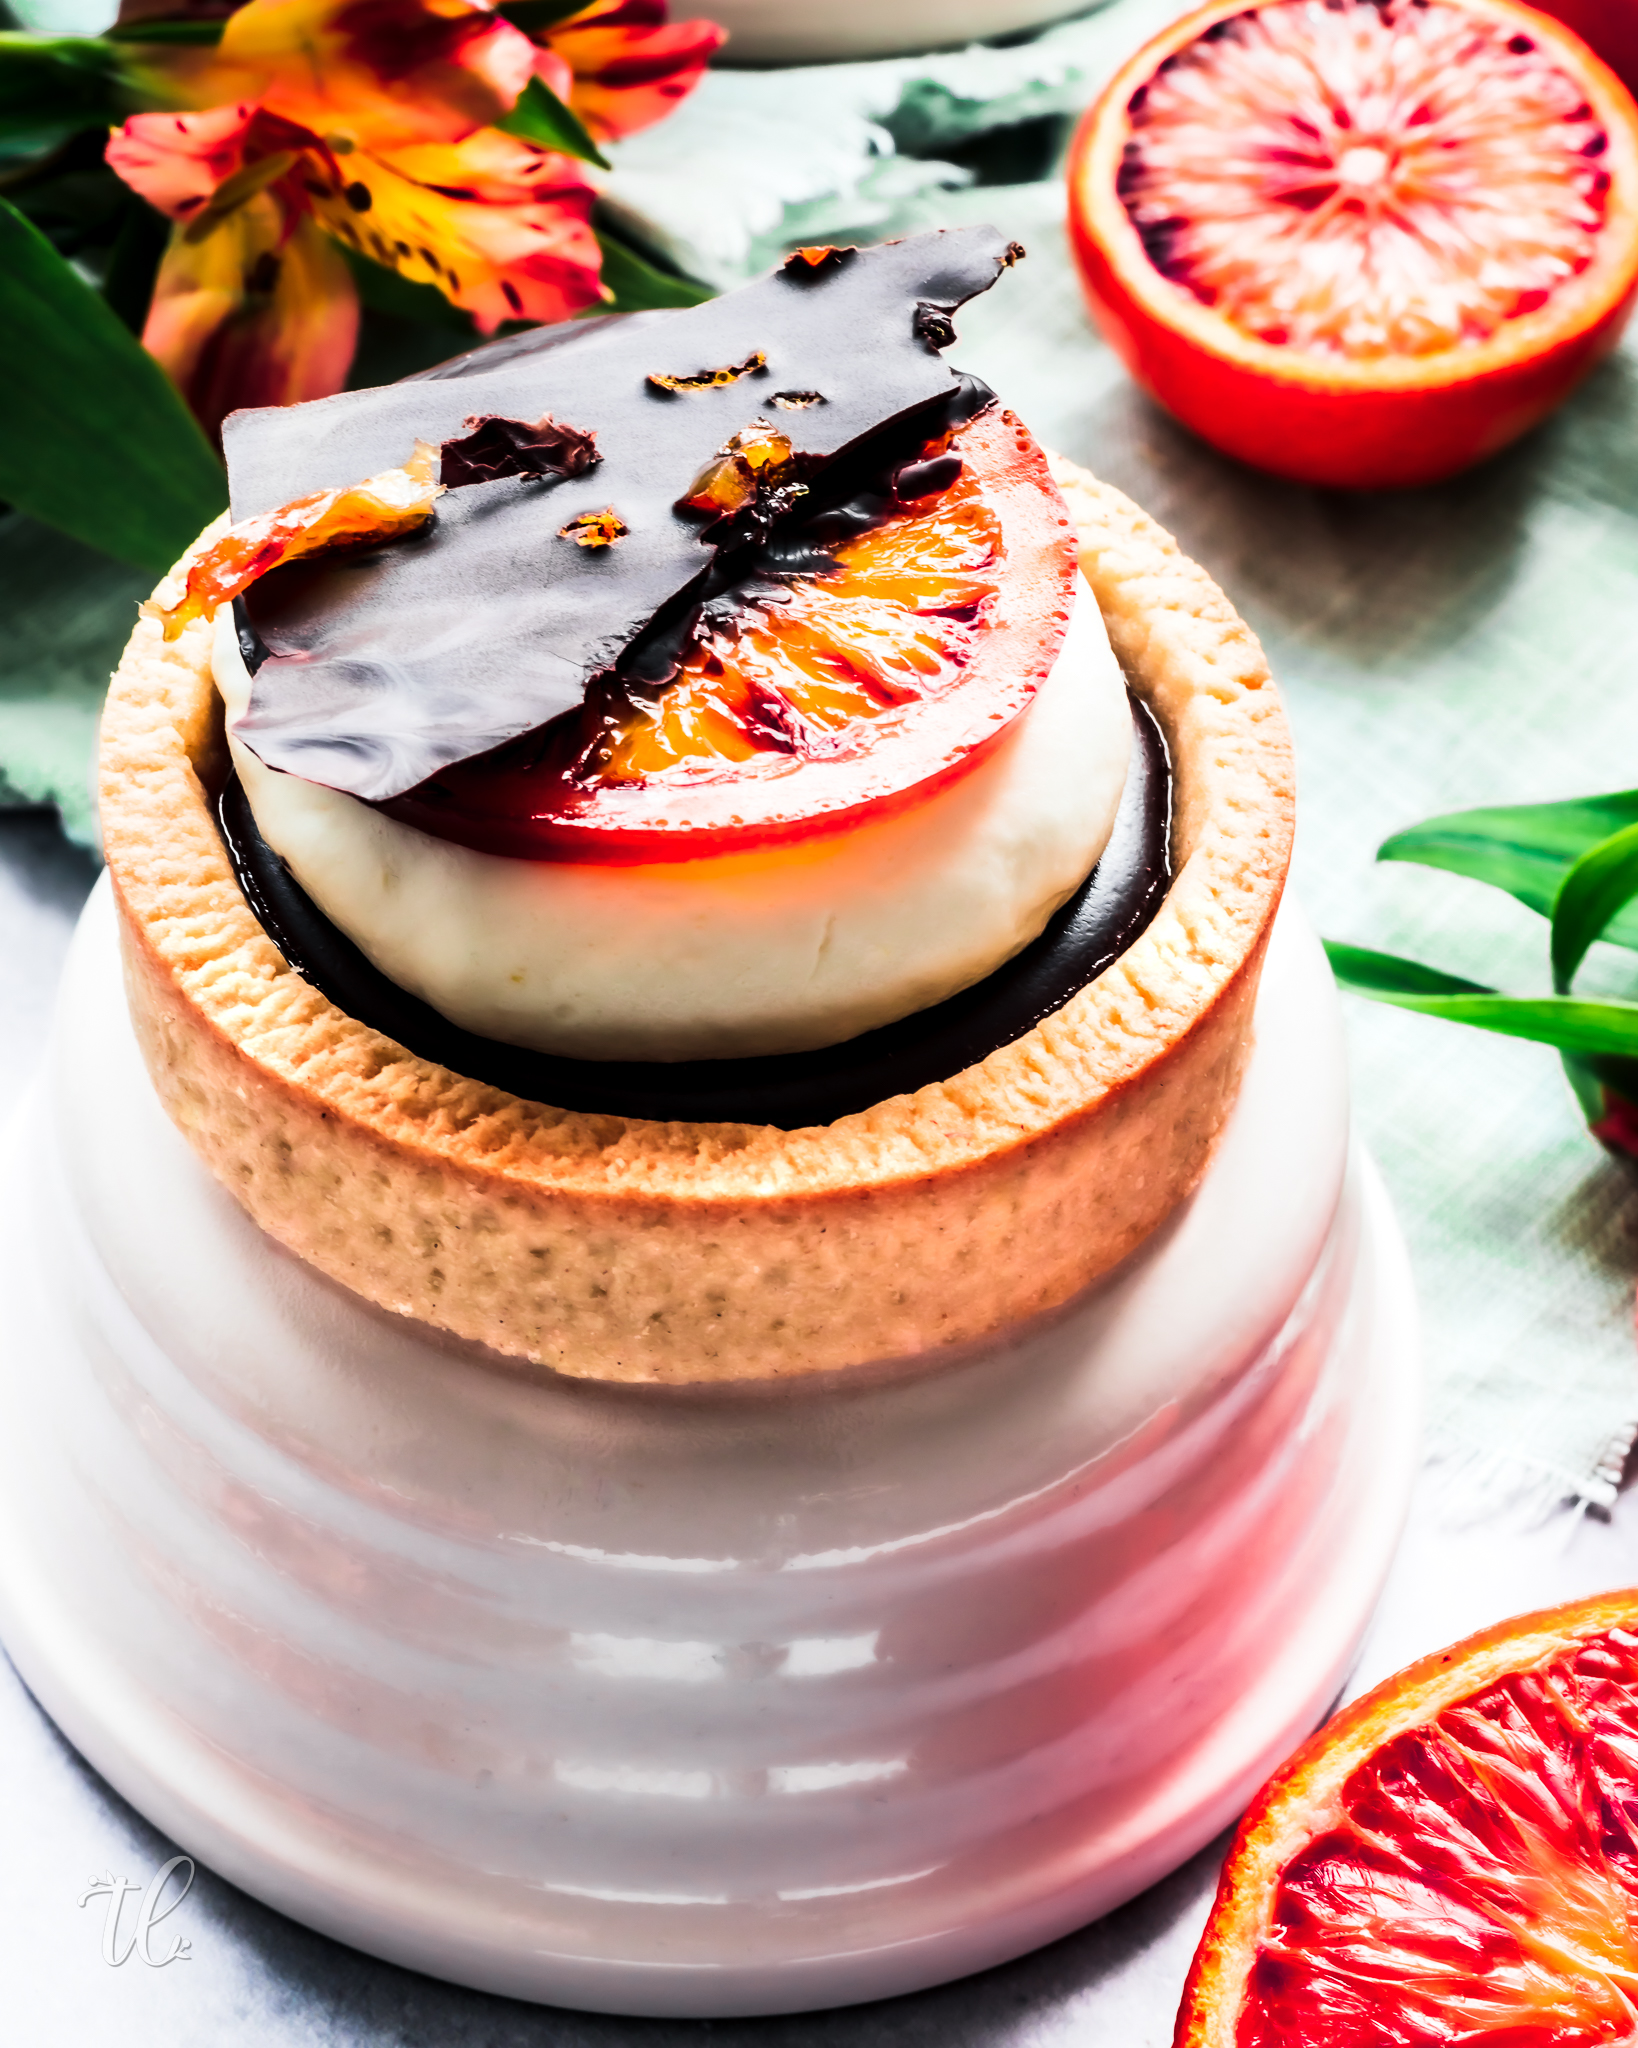
These tartlets are well worth the time. They have a short crumbly base, with a smooth punchy blood orange confiture, and a rich orange infused dark chocolate ganache. All of this is topped off with a light Chantilly cream.
When decorated with additional confit blood orange slices dipped in dark chocolate and broken shards of dark chocolate, these desserts will surely impress your guests. Or if you are like me, simply make a nice treat for your afternoon tea!
- Ready in24 Hours
- Makes8
- Serving Size1 Tarlet
- Course
- Cooking Method
- Suitable for Diet
- Dairy Free
- Vegan
- Vegetarian
- Tags
Ingredients
Confit Blood Oranges
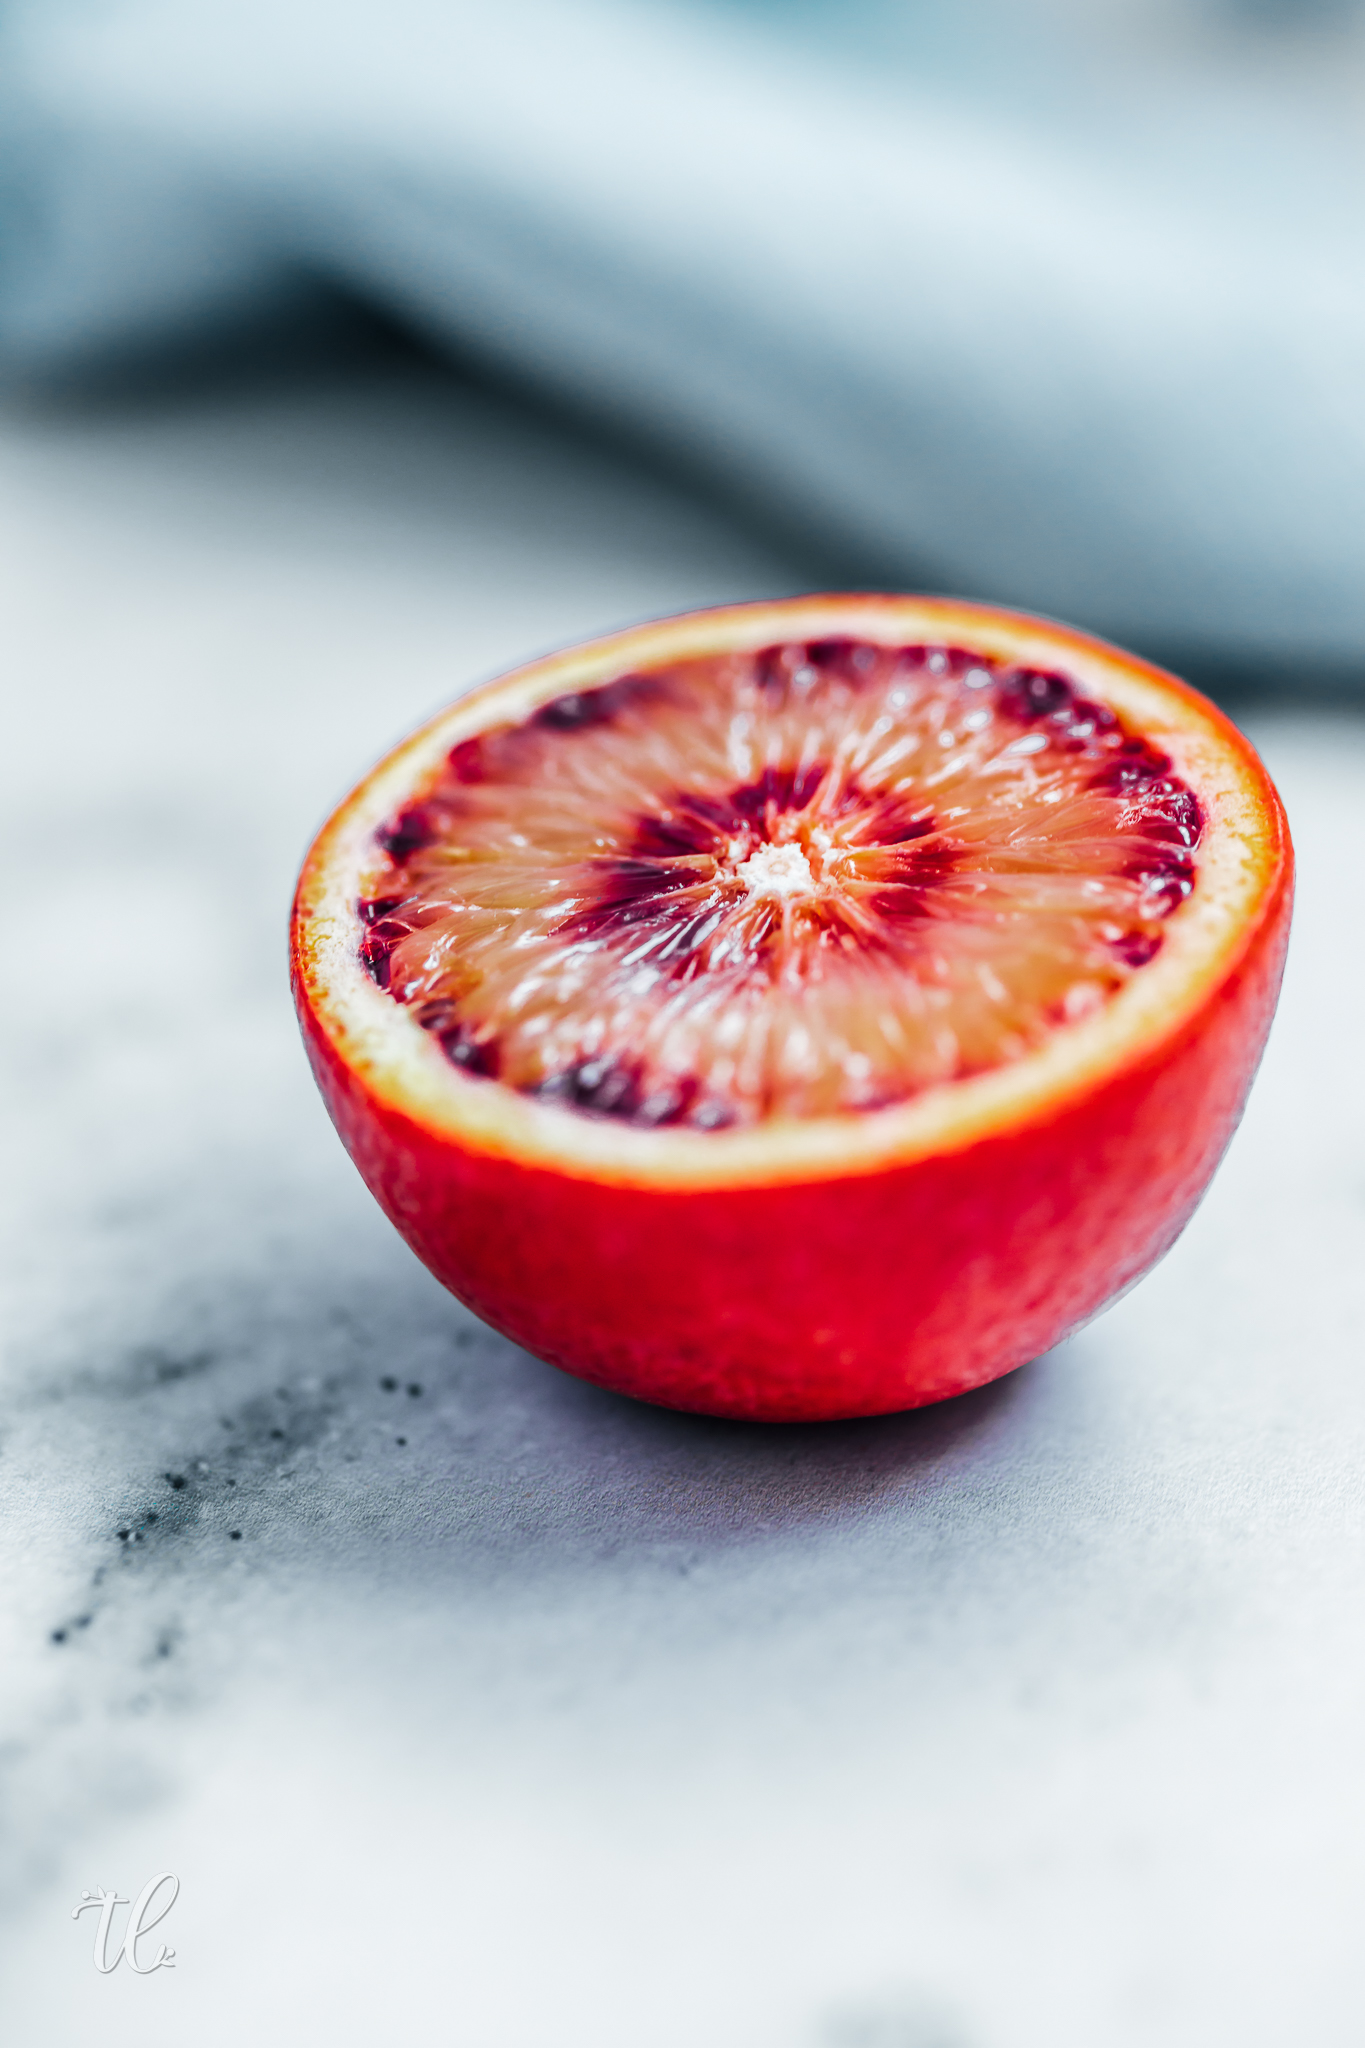
- 5 Fresh Blood Oranges
- 600 gms of Caster Sugar
- 700 mls of Water
Confiture
- 200 gms of the Confit Blood Orange Syrup
- 15 gms of Caster Sugar
- 6 gms Pectin
- 4 Slice of Cofit Blood Oranges – Roughly Chopped
Pâte Sablée Pastry
- 160 gms Cold Dairy Free Butter cut into small cubes
- 50 mls Coconut Cream
- 50 gms Coconut Flour
- 120 gms Powdered Sugar
- 300 gms of Plain Flour
- 1 Teaspoon of Vanilla Extract
- Pinch Salt
Dark Chocolate Ganache
- 150 gms of Whippable Full Fat Dairy Free Cream – I used half/half Coconut Cream + Elmlea Plant Double Cream
- 175 gms Vegan/Dairy Free Dark Chocolate – Kokoa Collection 82% Madagascar
- 20 mls of Orange Liqueur
- 2 Tablespoons of Confit Syrup
- 1-3 Drops of Orange Oil
Blood Orange Chantilly Cream
- 220 mls Whippable Full Fat Dairy Free Cream – Elmlea Plant Double Cream
- 30-40 gms Powdered Sugar
- 3-4 Slices of the Confit Blood Oranges – Roughly Chopped
- 2 Tablespoons of Confit Syrup
- 1 teaspoon Vanilla Extract
Garnish
- Dark Chocolate
- 1 Finally chopped Confit Blood Orange Slices
- 1 Finely Grated fresh Blood Orange Peel
Method
Confit Blood Orange Slices
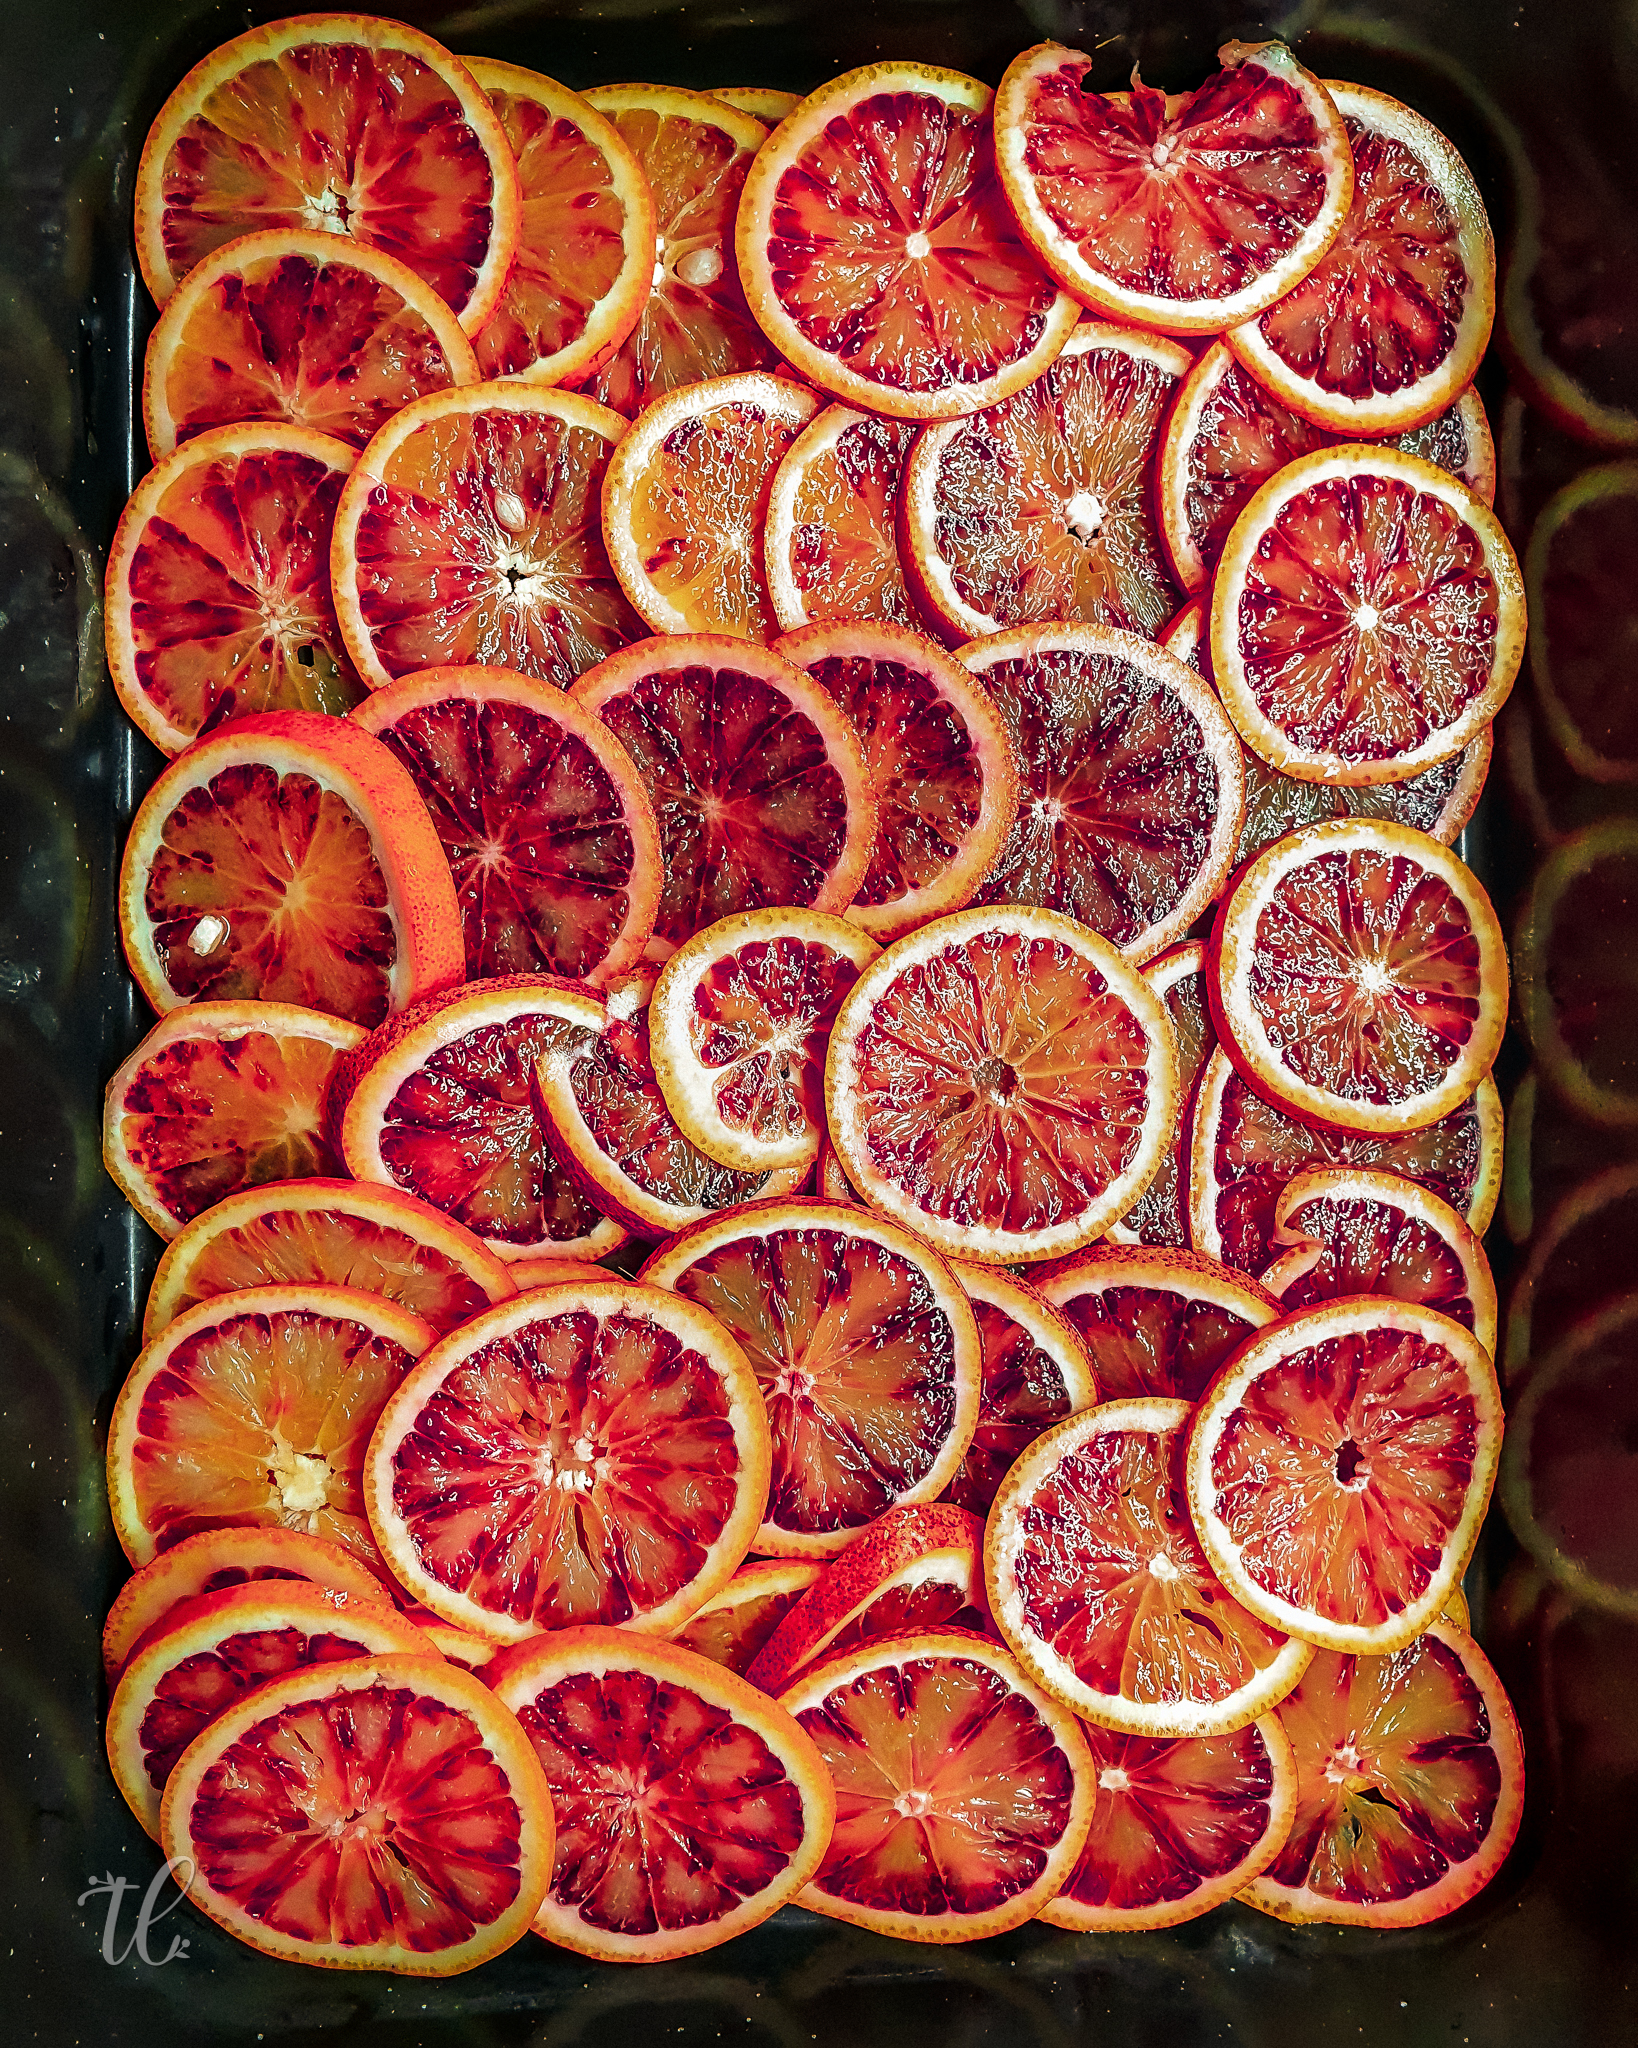
Wash and dry the blood oranges in warm water to remove any wax and dust. Thinly slice the oranges to a thickness of approximately 3mm per slice.
In a medium saucepan, add the sugar and water. Heat over low heat, continually stirring until all the sugar dissolves.
Once the sugar has dissolved, turn up the heat to a soft simmer, and allow it to thicken for approximately 15-20mins. The liquid should have turned to a thin syrup consistency.
In a shallow flat baking tray, lay your slices of blood oranges. Pour the syrup over the top, then cover with some baking paper. Push the baking paper so that it touches the surface of the oranges and syrup, to create a “cartouche” then cover tightly with foil.
Place in oven on a very low heat of 150C/Gas Mark 2/300F for 1 Hour. Remove and uncover, then cook for 1 hour longer, or until the blood oranges are transparent around the pith, and the syrup has thickened. *¹
When ready, place in sterilized jars while still hot and seal tightly. *²
Blood Orange Confiture
Mix the pectin with the sugar and set it aside.
In a small saucepan, add the syrup and heat to a slight simmer.
Remove from and sparsely sprinkle some of the pectin and sugar into the syrup whilst whisking until combined. Continue adding in small parts until fully incorporated and no lumps are present.
Place back onto the heat to return to a low simmer and cook for 1 min.
Remove and place in a container, then cover with plastic wrap, ensuring the plastic is touching the surface of the confiture to prevent a skin from forming. Place in the fridge to cool and set for around 2-3 hours.
Once set, remove from fridge and using a wand blender, aerate the confiture to create a creamy texture then mix through the chopped pieces of confit blood orange with a spoon, and place confiture in a piping bag ready for assembly.
Pâte Sablée Pastry Cases
In a stand mixer, combine all the dry ingredients using the whisk attachment.
Change to the dough paddle and add the butter cubes. Combine until no large lumps are present and the mixture resembles fine breadcrumbs.
Add the vanilla and coconut cream and mix until the dough comes together in a ball. Do not be tempted to overmix it.
Remove from mixer, and press together in a ball. Store in the freezer until ready to use.
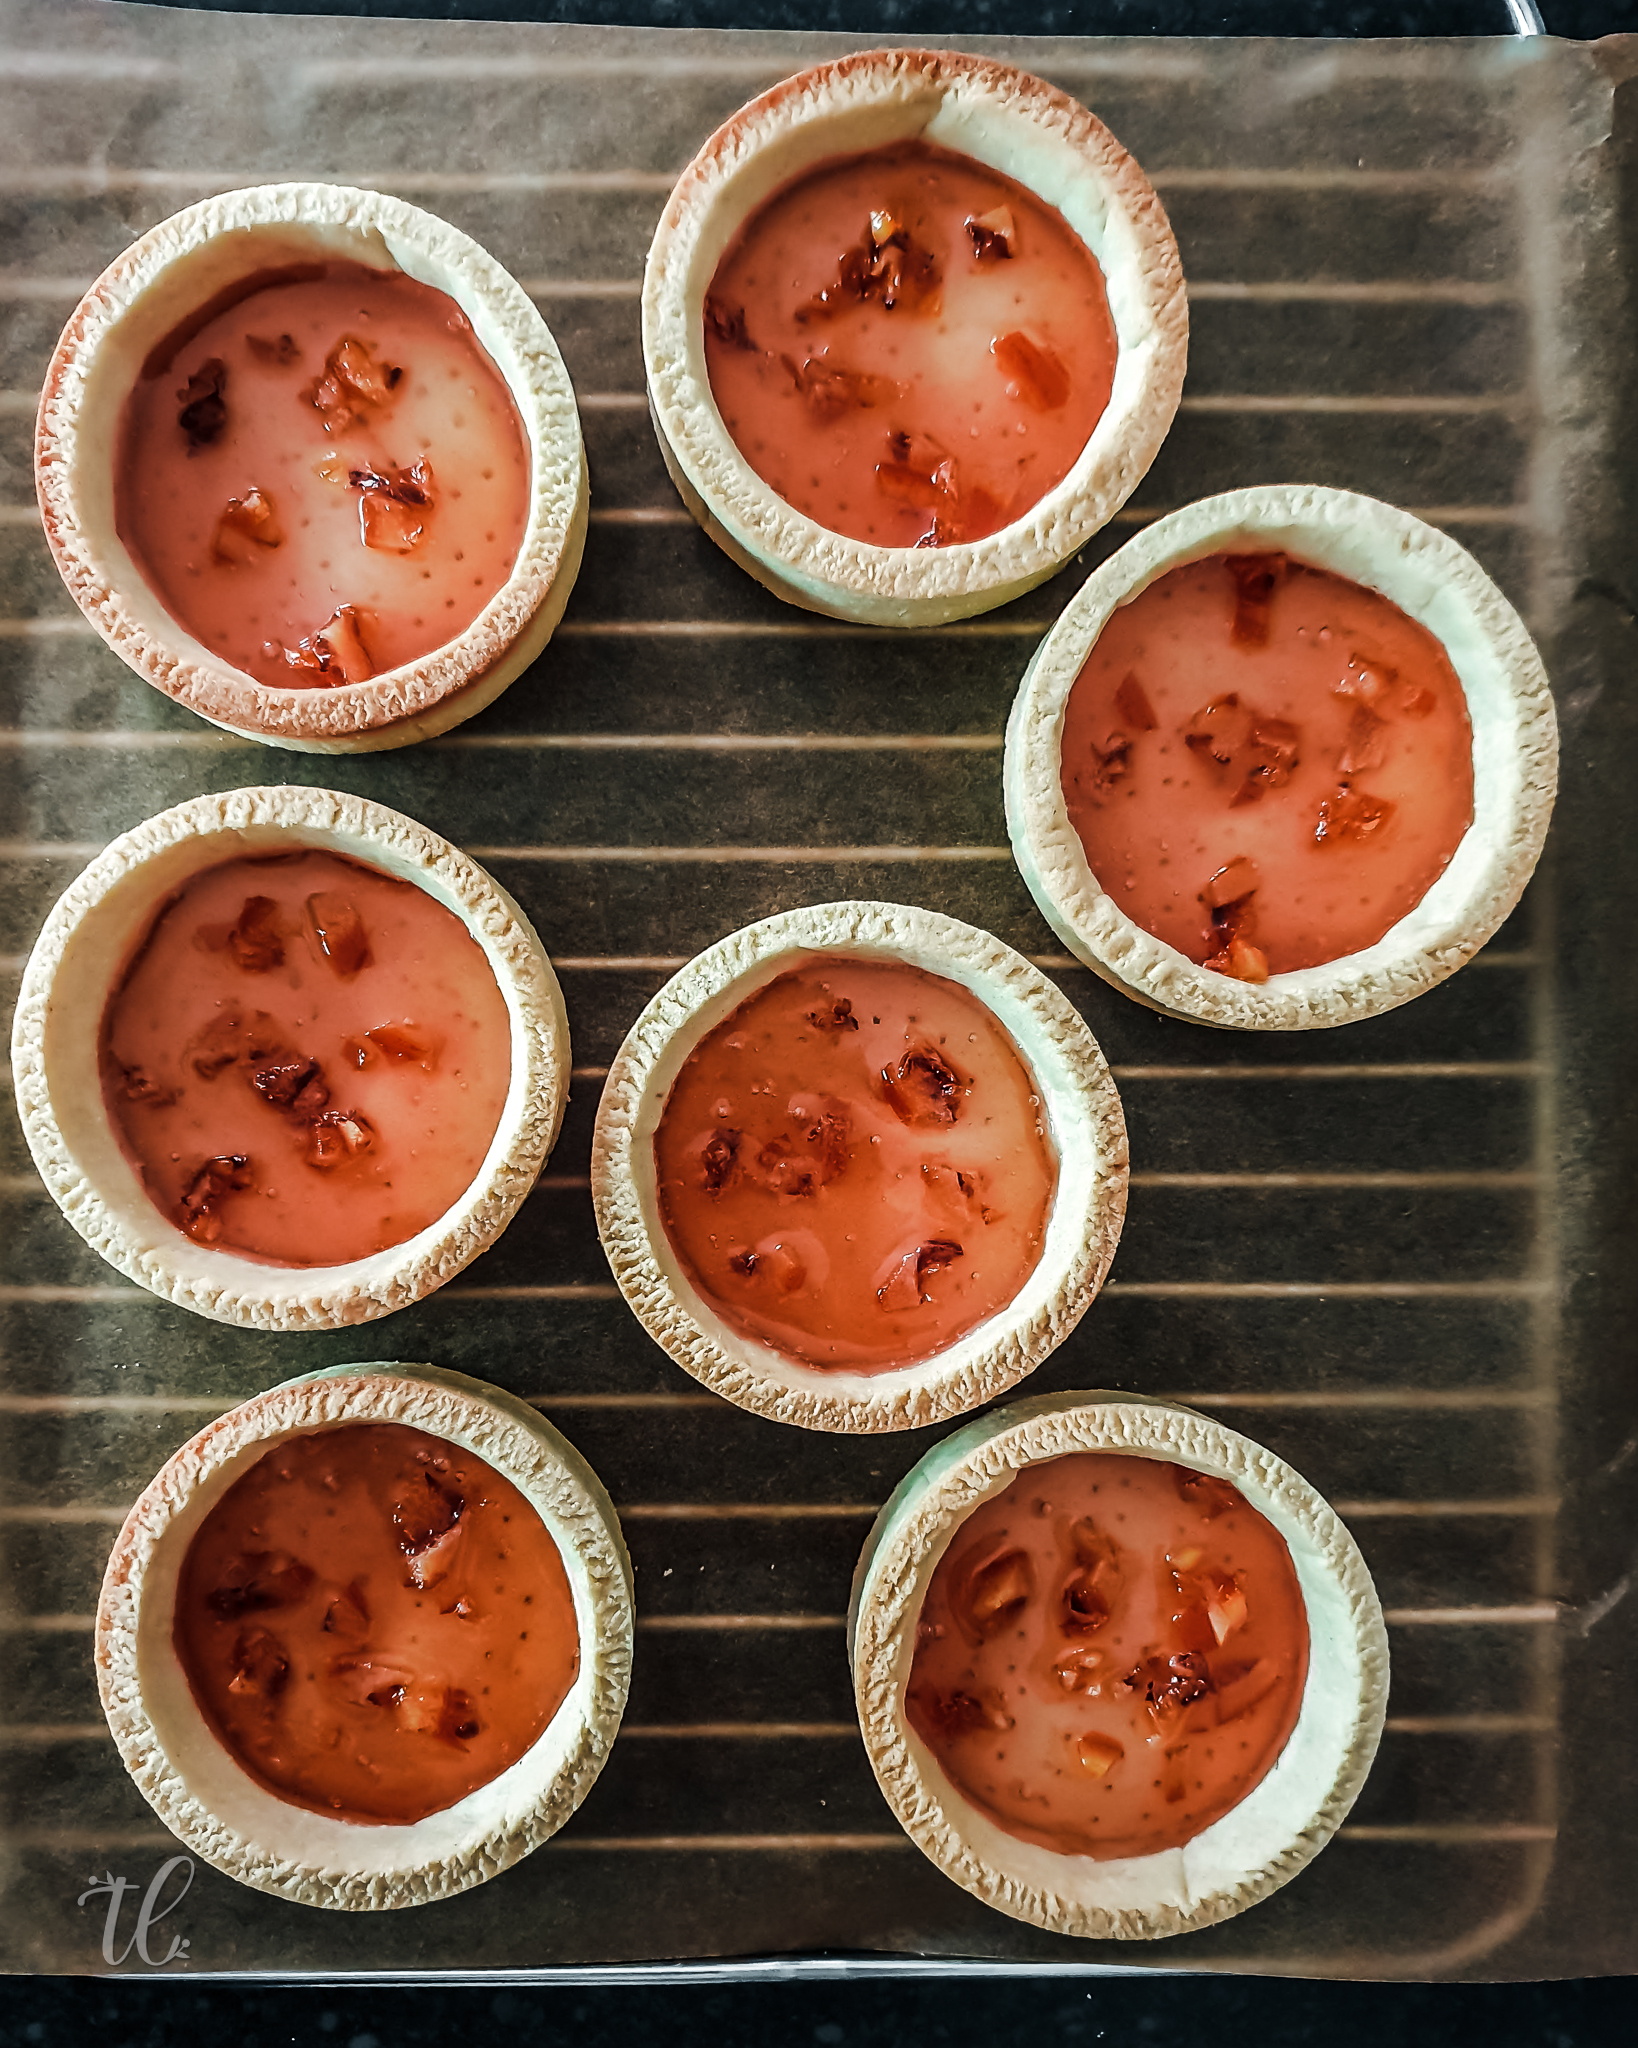
To roll, place between two sheets of baking paper and use a rolling pin to a 5mm thickness then place into single tartlet rings.
To do this, first cut the base using the tartlet ring and set aside.
Then with a ruler, cut strips long enough to cover the circumfrence of the ring. For example if your rings are 7cm x 7cm your strip lengths should be at least 16cms in length.
Wrap the strip around the inside of the tartlet ring and press the join together then trim any overlap.
Note: Alternatively if you find the pastry is of a crumblier texture and the strips are not holding together, cut out your bases, then you can press the pastry directly into the sides of the tartlet rings using your fingers and then use the flat side of a spoon to smooth.
Next align the ring above the base you cut earlier, and press downwards. The base will stick and seal to the inside pastry. Trim any pastry from the top to create an even looking tartlet.*³
Dock the bases and rest in the freezer for at least 30 minutes.
Arrange on baking paper or a silmat and bake in the oven at Gas 4/175C/350F for 12-15 minutes until slightly golden on the edges and the underside base no longer looks translucent.
Allow cooling for 10mins then gently remove from the tartlet rings and sit on a cooling rack until ready to assemble.
Dark Chocolate Ganache
Chop chocolate and place in a tall slim jug.
Add all the remaining ingredients for the ganache into a small saucepan and heat to a low simmer.
Remove from heat, and pour the liquid over the chocolate. Let it sit for 1 minute, then using a hand blender and keeping it submerged, start to emulsify the chocolate and cream. Work from the centre, outwards, until a smooth, shiny ganache forms. Be sure to emulsify thoroughly or your ganache will have unpleasant colouring and streaks when set.
Place in a piping bag and allow to cool to room temperature until ready to assemble the tartlets.
Chantilly Blood Orange Cream
Note. These steps can be done after the assembly of the tartlets while the ganache sets in the fridge.
Using the whipping attachment on the stand mixer, whip the vegan cream until medium peaks are achieved. Add the reamining ingredients and continue whipping until firm peaks form. Place the Chantilly Cream in a piping bag and store in the fridge until ready to use.
Garnishes
Note. These steps can be done after the assembly of the tartlets while the ganache sets in the fridge.
Temper (or melt) the dark chocolate.
Half dip slices of the confit blood oranges for each of the tartlets.
With any leftover melted chocolate, spread it on a tray and grate fresh blood orange zest, and some chopped pieces of confit blood oranges and allow to set in the fridge for an hour the break into random pieces ready to use for decorating.
Assembling the Tartlets
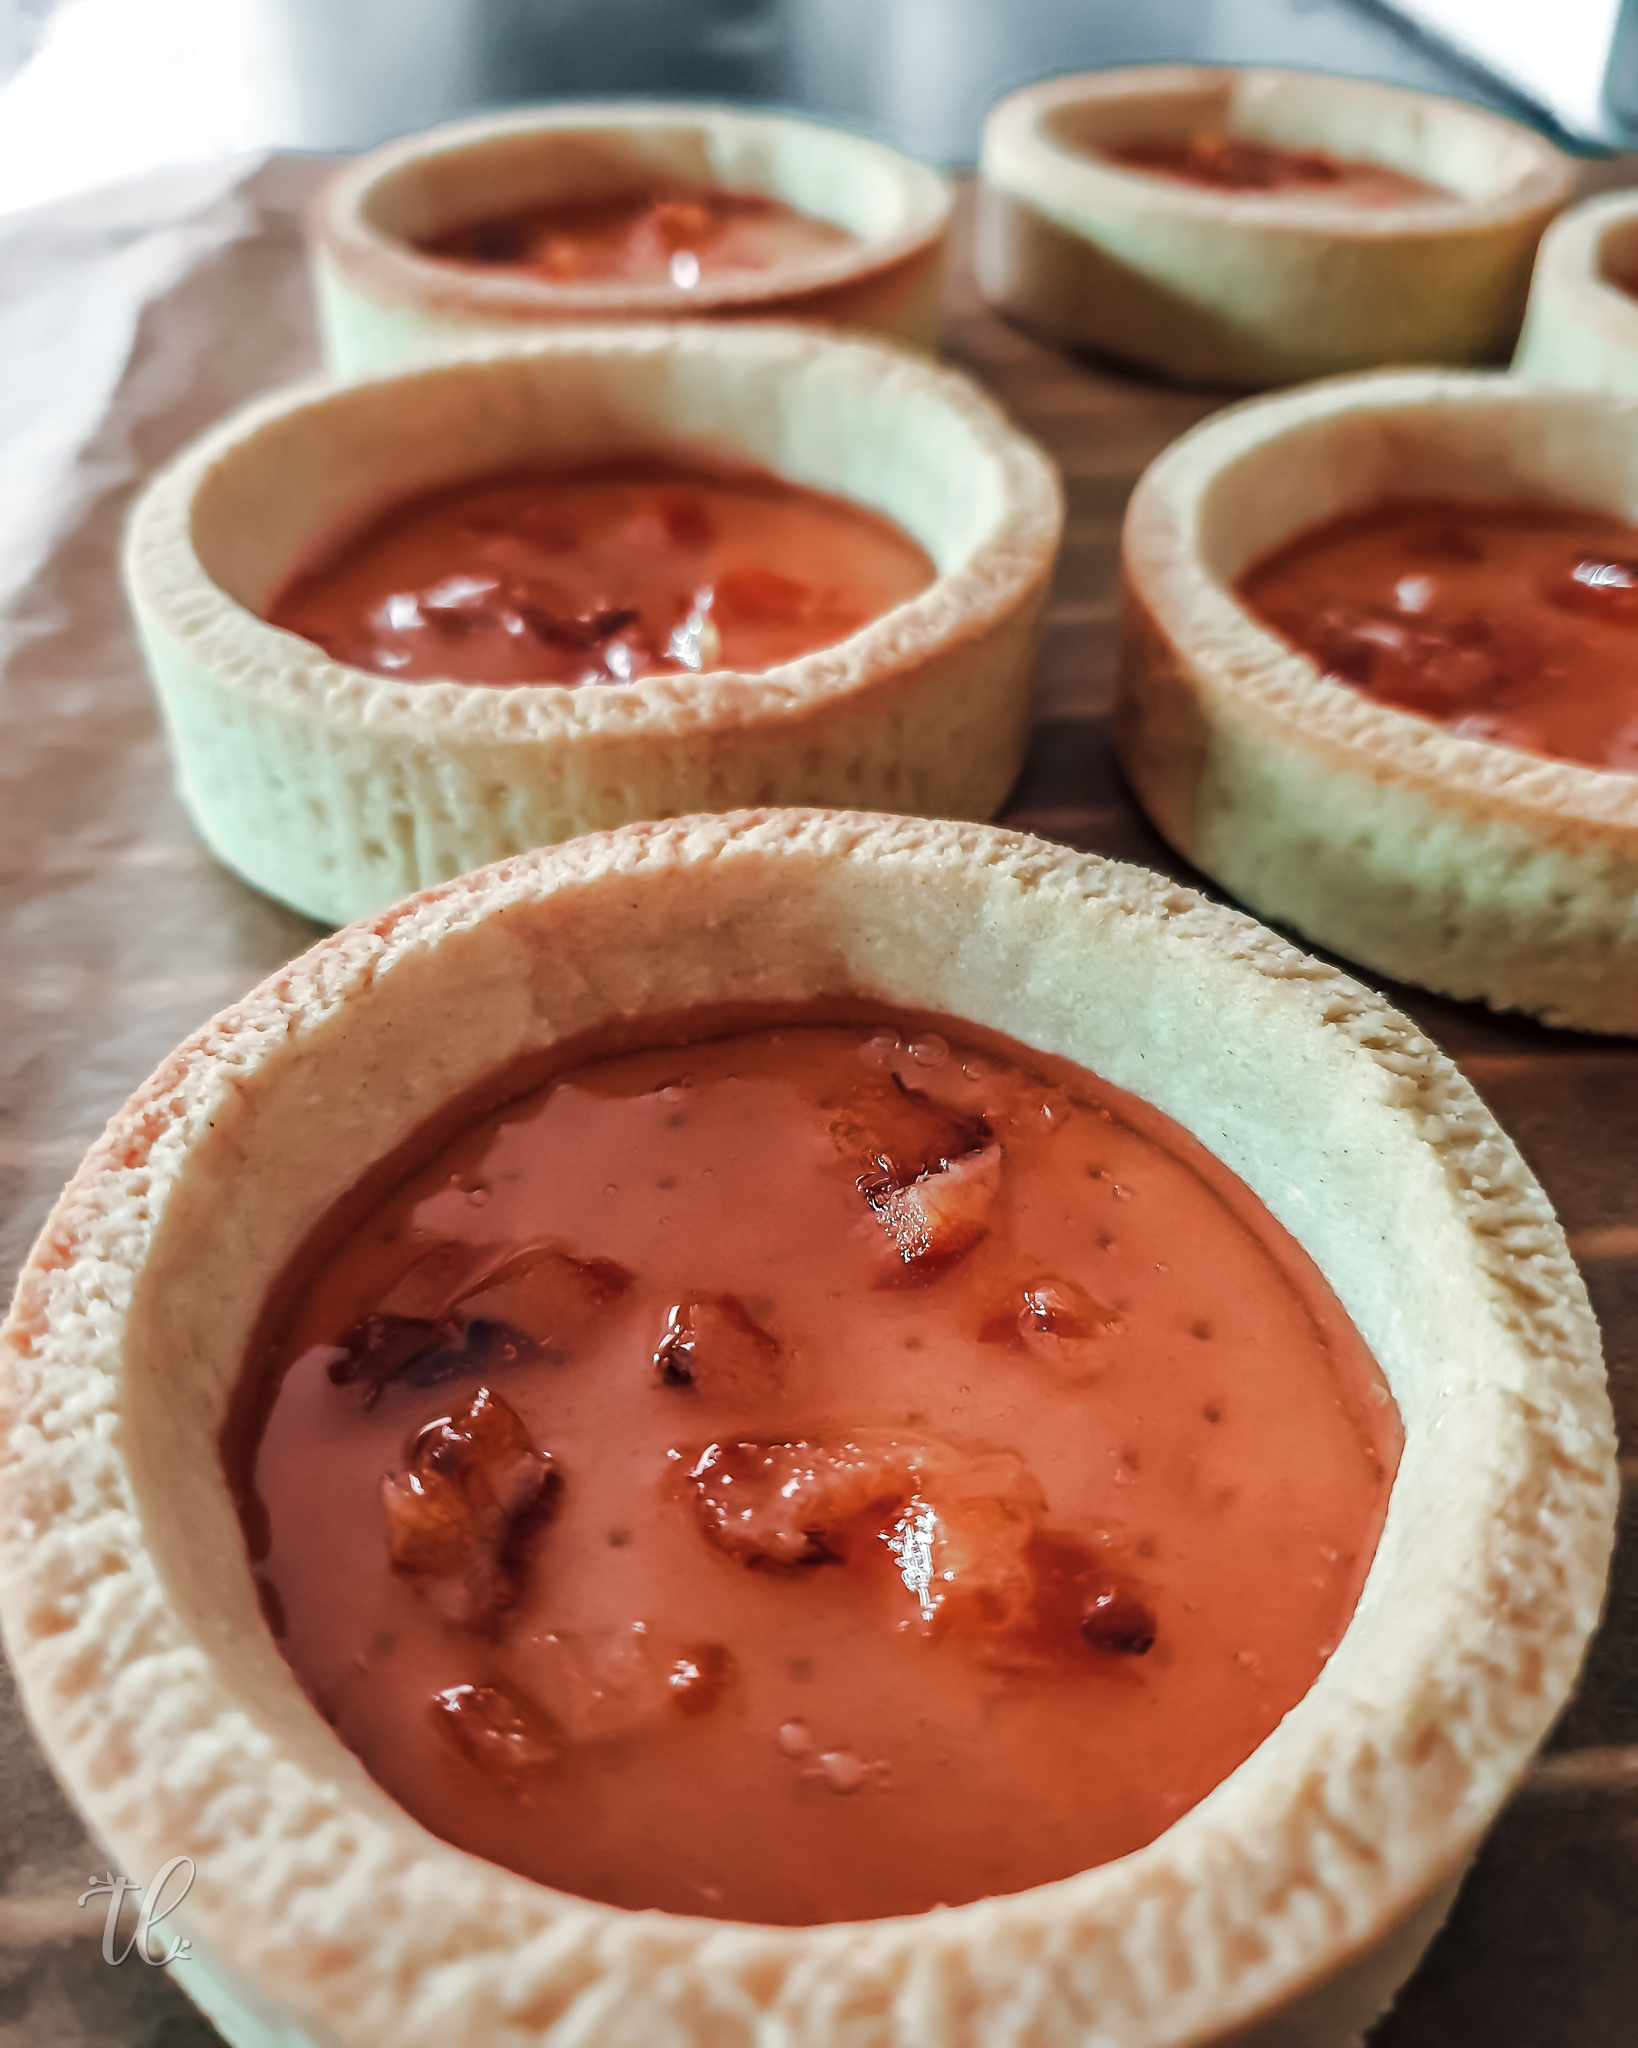
Cut a large enough hole off the piping bag containing the confiture to ensure an even flow without any orange pieces blocking.
Pipe enough confiture to cover the base of each of the tartlets to approximately a quarter of the way up.
Place in the freezer for 15mins and allow to settle, then remove and fill the tartlets to the top with the chocolate ganache. Pipe in a circular motion from the inside out will give even coverage. Use a toothpick to remove any air bubbles on the surface.
Store tartlets in the fridge to set for as long as possible preferably overnight, or for at least 3 Hours.
Prepare your Garnishes and Blood Orange Chantilly Cream.
Before serving pipe the Chantilly Cream ontop and decorate with chocolate dipped confit orange slices and broken pieces of chocolate.
Share this
EQUIPMENT
- MUST HAVE - 8 Tartlet Rings 7cms x 7cms
- MUST HAVE - Wand Blender
- MUST HAVE - Baking Paper
- MUST HAVE - Stand Mixer with a Whisk and Pastry Attachments
- MUST HAVE - Piping bags with a large nozzles or disposible bags.
- RECOMMENDED - Silmat
Recipe Notes
- If you find the syrup is not thick enough after cooking your confit slices, remove the slices and place the syrup back into the oven on its own until it thickens to a syrup consistency.
- I like to wash the jars in hot soapy water, rinse thoroughly in hot water, then put the jars in the microwave for 1-2 minutes to sterilize.
- Any leftover pastry can be wrapped up in baking paper or plastic wrap and stored in the freezer. The pastry can also be used to make shortbread biscuits or creamed biscuits. Roll, use a cookie cutter and bake for 10 mins.


You May Also Like
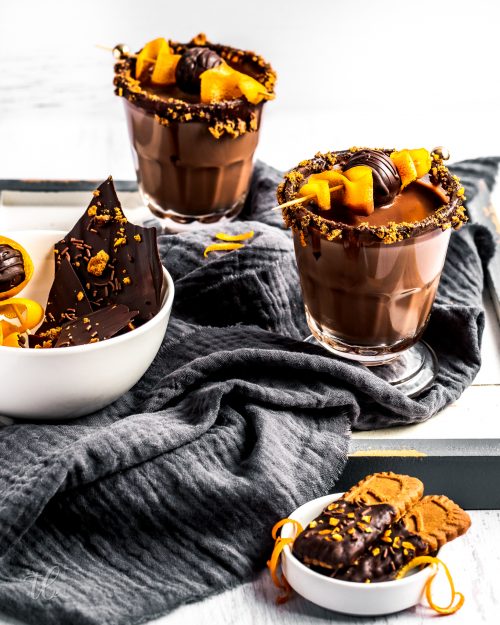
Spiked Speculoos & Orange Hot Choctails
3 December 2020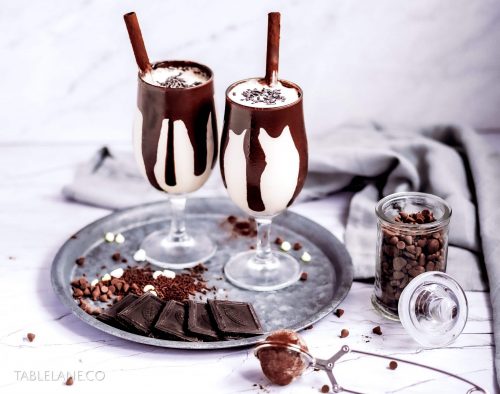
Grown-up Chocolate Milkshakes
7 July 2020